Secure Passwords
Overview Copied
This document explains how to use secure passwords on the Gateway, as well as how to decrypt encoded environment variables.
Operation Copied
Types of password offered by the Gateway and how to generate them Copied
There are a number of places where it is possible to specify passwords in your setup. For example, to access external resources or to access secure commands.
The Gateway supports the following methods of specifying passwords:
One way
Encoded passwordsThese are one way hashes used to specify the Netprobe passwords. This is essentially the Unix crypt format.
The Gateway Setup Editor can configure and transmit this password to the Netprobe for you. Alternatively, the start Netprobe script can supply a password by setting the ENCODED_PASSWORD environment variable. This is documented in the template file. To encrypt the password using the Gateway, use:
gateway -pw <password>
Two way
When interfacing with external systems, it is necessary to securely encrypt the password within the setup but also to decrypt them when required to supply the password to an external API such as an interface to a database. The Gateway supplies the following ways of specifying passwords.
-
AES 256 bit Encryption (stdAES)
This uses 256 key to produce a hash of the password.
The Gateway Setup Editor handles the encrypting for you but if you are generating your setup dynamically, or manually editing the XML for some reason, you can use the Gateway to generate your passwords using:
gateway -aes256-encrypt <password>
-
Geneos Standard Encoding (std)
This encodes (rather than encrypts) the password so that it is not immediately apparent what the password is. However, this does not offer the level of protection that encrypting the password would.
The Gateway Setup Editor handles this encoding for you, however you can use the Gateway to generate these from the command line using:
gateway -en <password>
Caution
This option has been deprecated.
External password provider (extPwd)
Specify passwords by requesting them from secured external sources. You can configure the source from Operating environment using the Gateway Setup Editor.
Plain text (plain-text)
Specify a password without any encryption. This is not advised and is only provided for testing purposes.
Caution
This option has been deprecated.
Variable (Var)
Specify a password with a variable. Variables can be defined in managed entities, managed entity groups, types, environments and operating environment. You can provide any of the above password types using a variable. For more information, see User Variables and Environments.
Securing your Gateway with a supplied key Copied
It is recommended that you use the most secure method of storing your passwords possible within your configuration. The Gateway provides AES 256 implementation, this is the recommended method unless you are using an external password manager.
Gateway uses a built-in key to encrypt your passwords by default. You can supply your own key to increase the security of your passwords. See below for how to do this.
Warning
If you supply your own key, any existing AES 256 encrypted passwords will no longer be valid.
How to generate your own AES-256 key Copied
An AES 256 key actually has two parts:
- A key.
- An initialisation vector.
Caution
Do not edit the key file while the Gateway is running. The Gateway detects the change and generates an error at whatever reload interval is set. Remember that all passwords in the setup will need to be re-entered if this file is changed.
You can use openssl tool on the command line to generate your own key and initialisation vector:
- Use either of the following commands, replacing
<encryption phrase>with any phrase or letters you want:
openssl enc -salt -aes-256-cbc -k "<encryption phrase>" -P -md sha1 -iter 10000 > keyfile1.aes
openssl enc -salt -aes-256-cbc -k "<encryption phrase>" -P -md sha1 -pbkdf2 > keyfile2.aes
The command produces output in the following form:
key=92358925C00DE524B4F325A7F488DF1F29646313F6D258090818E8C9B69CF4D8
iv =B8B606E4700FE4D05E24E1A682F5963D
The command produces a different result each time it is run.
- Copy these lines into a file or redirect the output of this command into a file.
Note
This product includes software developed by the OpenSSL Project for use in the OpenSSL Toolkit (http://www.openssl.org).
How to change the key file of a Gateway Copied
Gateway uses a key file to encrypt all the AES passwords in your setup file. When starting a Gateway for the first time you can either use the built-in key or specify your own key using the -key-file <filename> option.
When a Gateway starts, it generates an MD5 hash of its key (either the specified key file or the built-in key), and stores the hash in Gateway’s cache. The next time the Gateway starts it checks if the cached key hash matches the specified key file, or if you run Gateway again with no specified key file, it checks if the cached key hash matches the Gateway’s built-in key. The Gateway refuses to start if there is a cached key hash and it does not match the current specified key. This checking is done to prevent you from unintentionally starting the Gateway with a different key from the one used previously.
If you want to change the key used by an existing Gateway, you can override the above cache checking by using either the -skip-cache option or the -previous-key-file <filename> option.
Change a Gateway key using -skip-cache Copied
You can start a Gateway using the -skip-cache option, the Gateway will start even if the cached key hash does not match the new key.
Caution
Running Gateway with these commands overwrites the cached key with the new or built-in key. Before you do this, you must make sure that you have already re-encrypted all the AES passwords in your setup file with the new key. Otherwise, old passwords will not be decrypted correctly.
To change the key file of your Gateway, you can start it with both -key-file and -skip-cache options.
gateway2.linux_64 -key-file <key-file> -skip-cache
Alternatively, to change the Gateway key to the built-in key, you can start it with the -skip-cache option only.
gateway2.linux_64 -skip-cache
Change a Gateway key using -previous-key-file Copied
If you have not re-encrypted all the AES passwords in your setup file, then you can use the -previous-key-file <prev-key> option instead. This allows Gateway to use two keys while you transition to a new key. However, this parameter cannot be used when transitioning from the built-in key to a new key.
If a Gateway cannot decrypt an AES password in the setup file using its main key, it will try to decrypt the password again using the specified prev-key. If an AES password required the previous key, the Gateway Setup Editor will generate a warning. If an AES password could not be decrypted, the Gateway Setup Editor will generate an error.
When started with this option, the Gateway will overwrite the cached key hash with the hash of the new main key and also store the hash of the specified previous key file in its cache. To ensure you are using the correct keys, the Gateway will not start if there is a cached key hash and it does not match either key.
The next time you run Gateway again, you must either:
- Keep specifying the same
prev-key. - Stop specifying a previous key file. Do this only when you are done re-encrypting all the AES passwords. In this case, the Gateway will no longer decrypt using the old key file.
To change the key file of your Gateway, you can start the Gateway with both -key-file and -previous-key-file options. Then you must re-encrypt your passwords with the new key.
gateway2.linux_64 -key-file <new-key-file> -previous-key-file <previous-key-file>
Alternatively, to change the Gateway key to the built-in key, you can start it with the -previous-key-file option only. Then you must re-encrypt your passwords with the built-in key.
gateway2.linux_64 -previous-key-file <previous-key-file>
How to encrypt a password with the new key Copied
Since you can start a Gateway with a different key, you also need a way to encrypt passwords using the new key. You can do this using the Gateway Setup Editor or on the command line.
To encrypt a password with the new key using the command line, use the -aes256-encrypt option replacing <password> with your desired password, and <key-file> with your key file:
gateway -aes256-encrypt <password> -key-file <key-file>
This command outputs the encrypted text of the specified password, which can be added to a Gateway XML setup:
Encoded text:
+encs+69B1E12815FA83702F0016B0E7FBD33B
As an example, consider the command is below:
gateway2.linux -aes256-encrypt PassW0rd -key-file shh.aes
Decode encrypted environment variables Copied
As detailed in Securing your Gateway with a supplied key, the Gateway can be given a key file that is used to encrypt secure password fields.
You are required to supply your own key file if you want to send your own encrypted environment variables to a Toolkit. The Gateway can use it’s own key but we do not supply a means for a third party to decrypt these.
See How to generate your own AES-256 key for how to generate your own key, and How to generate password with the new key for how to use your new key to make passwords.
To decrypt your password you need to convert the hexadecimal back to base64 for use with openssl and provide the contents of your key file.
Below is a bash script demonstrating how to do this.
decode.sh
#!/bin/bash
hex=${1#*+encs+}
salt=$(grep salt key-file)
key=$(grep key key-file)
iv=$(grep iv key-file)
echo ${hex}| xxd -r -p | base64 | openssl enc -d -aes-256-cbc -S ${salt#*=} -K ${key#*=} -iv ${iv#*=} -a
Note
xxd is part of the vim-common package which you may have to install separately.
To use this script to convert an environment variable, replace the ‘1’ in the second line with the name of the environment variable. All encrypted variables start with +encs+ so this removes the prefix prior to decoding. Example of usage:
./decode.sh +encs+69B1E12815FA83702F0016B0E7FBD33B
Securing your Gateway with an external password provider Copied
You can configure a Gateway to retrieve passwords from an external provider. This allows passwords to be encrypted and stored by another application.
Gateway supports the following external providers:
- CyberArk Central CP
- CyberArk Local CP
- HashiCorp Vault
Note
Only one external provider can be used at a time.
Configure the operating environment Copied
To use an external password provider, you must configure the connection to the provider server in the Gateway Operating environment. The provider must be accessible to the Gateway over the network and you must provide valid credentials to access the password store.
To configure an external provider:
- Open the Gateway Setup Editor.
- Navigate to Operating environment.
- Open the Advanced tab.
- Click External passwords, this creates a new section.
- Specify the Provider.
- Specify the Provider information.
- Specify a Validation timeout. This determines how long Gateway should wait after setup validation for responses to outstanding password requests.
- Specify a Refresh Interval (hours). This determines how often the Gateway should refresh the password cache by querying the external credentials provider. The value is set to 24 hours by default.
- Click Validate current document

- Click Save current document

CyberArk Central Credential Provider Copied
The CyberArk Central Credential Provider (Central CP) allows the Gateway to fetch passwords from a central password vault using an API.

To use the CyberArk Central Credential Provider as your password provider, supply the following information:
| Field | Description |
|---|---|
| Server name | URL of the server. This should take the form If no port is specified, the default port Mandatory: Yes |
| Application id | Name used to identify the CyberArk permissions for the Gateway. This determines which passwords can be requested and must be configured in the CyberArk web interface. Mandatory: Yes |
| Client certificate | Path to the Mandatory: Yes |
| Client key | Path to the file containing the client key. This is not required if the client key has been provided as part of the Mandatory: No |
| Client key passphrase | Passphrase used to decrypt an encrypted client key. Mandatory: No |
When you request a password, the Gateway sends an HTTPS request to the CyberArk REST API containing a query for the required password. The correct queries will be provided by your CyberArk administrator.
A valid request will receive a JSON file in response. Gateway will parse the JSON file and extract the password. Passwords received by the Gateway are stored securely in memory using AES-256 encryption.
Test connectivity Copied
You can test whether your environment can connect to the CyberArk Central Credential Provider by manually performing a query using curl:
curl -k --cert client.pem 'https://<server>:<port>/AIMWebService/api/Accounts?AppID=<application_id>&Query=<query>
CyberArk Local Credential Provider Copied
The CyberArk Local Credential Provider allows the Gateway and the Netprobe to maintain a secure, actively refreshed password cache locally. This uses a local agent to access your central password vault.

To use CyberArk Local Credential Provider as your password provider, supply the following information:
| Field | Description |
|---|---|
| Application id | Name used to identify the CyberArk permissions for the Gateway. This determines which passwords can be requested and must be configured in the CyberArk web interface. Default: Mandatory: No |
| SDK path | Path to the application password SDK installed on the Gateway host. The path must be fully specified and cannot embed any references to environment variables. If no path is specified, the default CyberArk installation directory Mandatory: No |
Note
Configuring the CyberArk Local Credential Provider in the operating environment allows only the Gateway to use external passwords. To enable Netprobes to use external passwords, you must both configure the operating environment settings and install the local agent on each Netprobe host, and then configure external passwords on each Netprobe. For more information, see Probes.
In addition, the CyberArk Local Credential Provider is available on all platforms supported by the respective plugins, except Linux on IBM POWER8. For more information, see Plugin Support in Geneos Compatibility Matrix.
CyberArk Multiple Central Credential Provider Copied
You can specify multiple CyberArk servers when using this mode, allowing a single Gateway to fetch passwords from different CyberArk vaults using an API.

To use the CyberArk Multiple Central Credential Provider as your password provider, supply the following information:
| Field | Description |
|---|---|
| Name | User-defined identifier for the server configuration. This value is used to reference the server when requesting passwords. Mandatory: Yes |
| Server name | URL of the server. This should take the form If no port is specified, the default port Mandatory: Yes |
| Application id | Name used to identify the CyberArk permissions for the Gateway. This determines which passwords can be requested and must be configured in the CyberArk web interface. Mandatory: Yes |
| Client certificate | Path to the Mandatory: Yes |
| Client key | Path to the file containing the client key. This is not required if the client key has been provided as part of the Mandatory: No |
| Client key passphrase | Passphrase used to decrypt an encrypted client key. Mandatory: No |
To specify which of the servers to use for each external password, you must add an extra key-value pair in the query when configuring each external password. The key is GENEOS_PASSWORD_SERVER and its value should be set to the name of the CyberArk server (as defined in the Name field above) to use. The external password will not be sent if this key is missing. When using CyberArk (Central CP), this key is treated like any other key and sent to the CyberArk server.
For more information on configuring external passwords, see Use external passwords.
HashiCorp Vault setup Copied
The HashiCorp Vault integration allows the Gateway to fetch passwords from the Vault when it validates its setup.
The hashCorpVault setup assumes that you have configured the namespace in the URL of the secret in the extPwd section. In this case, the namespace is only used for the authentication request.
To make authenticated requests for secrets held in the Vault, the Gateway needs to obtain a Vault token. This can be obtained through any of the following ways:
- AppRole authentication — where the role ID and secret ID are configured in the Gateway setup.
- TLS certificate authentication — where a certificate is configured as trusted by a Vault administrator and the certificate and private key are specified in the Gateway setup.
- Custom authentication — where the Gateway runs an external script which obtains the Vault token.

| Field | Description |
|---|---|
| Server name | URL of the Vault server. This should take the form If no port is specified, the default port Mandatory: Yes |
| Server CA certificate | Path to a PEM file containing a Certificate Authority certificate (or certificate chain) which can be used to validate the certificate used by the Vault server. This is not needed if the Vault server certificate is already trusted by the Gateway host. Mandatory: Yes |
| Verify server certificate | Enables or disables server certificate verification. This setting can be set to false if the Vault server certificate is not trusted by the Gateway host and the CA certificate is not available. It should not be used in a production environment. Default: |
| Vault namespace | Namespace path of the HashiCorp Vault. Mandatory: No |
| Authentication mode | Selects the authentication method to use when obtaining a Vault token. Mandatory: No |
| Authentication mode > AppRole > Role ID | This is provided by a Vault administrator, and it is used by the Gateway to authenticate to the Vault. Mandatory: Yes |
| Authentication mode > AppRole > Secret ID | This is provided by a Vault administrator, and it is used by the Gateway to authenticate to the Vault. The secret ID should be stored using AES encryption, so that the plaintext value does not appear in the Gateway setup file. Mandatory: Yes |
| Authentication mode > TLS certificate > Client certificate | Path to a certificate in PEM format which has been configured as a trusted certificate by the Vault administrator. Mandatory: Yes |
| Authentication mode > TLS certificate > Client key | Path to the file containing the client key. This is not required if the client key has been included in the client certificate PEM file. Mandatory: No |
| Authentication mode > TLS certificate > Client key passphrase | Passphrase used to decrypt an encrypted client key. Mandatory: No |
| Authentication mode > TLS certificate > Role name | Name of the Vault role configured for TLS certificate authentication. This role must be configured in Vault by a Vault administrator and defines which certificates are allowed and what policies they receive. Mandatory: No |
| Authentication mode > Custom > Executable | Path to the script or other executable which the Gateway will run to obtain a token. This script should simply write the JSON object returned by the Vault API to its standard output; the Gateway will parse the token value from the JSON object. Mandatory: Yes |
| Authentication mode > Custom > Environment variables | These variables will be available to the script executed by the Gateway. Mandatory: No |
| Authentication mode > Custom > Secure environment variables | Environment variables containing sensitive values that are encrypted using AES encryption. These encrypted variables will be available to the script executed by the Gateway. The script can decode these variables using the method described in Decode encrypted environment variables. Mandatory: No |
Vault responses can include a time-to-live (TTL) value that affects how the Gateway caches credentials.
For HashiCorp Vault, if the JSON payload for a Vault secret includes a positive numeric ttl (in seconds) with the returned value, the Gateway treats it as the maximum cache lifetime for that password. The Gateway refreshes the password when this interval elapses, even if the configured Refresh interval (hours) has not yet passed.
If ttl is missing or is not a positive number, the Gateway refreshes the password only at the configured interval.
The ttl field is specified in seconds and appears in the same data object as the secret value. Vault can set this field when credentials are rotated. In this case, ttl counts down to the next expected password change.
{
  "data": {
    "password": "<redacted>",
    "ttl": 299
  }
}
HashiCorp Vault Agent setup Copied
The hashCorpVaultAgent setup adds the namespaces to HTTP requests by including the X-Vault-Namespace header.
Configure this setup using the same fields as the HashiCorp Vault setup in the table above.

Using a custom authentication script Copied
To use custom authentication with HashiCorp Vault, you must supply a script (or other executable) which makes a Vault token request and writes the results to standard output.
The parameters for the token request may come from the Gateway setup (via environment variables) or from one or more calls to other services. In addition to any environment variables explicitly configured in the setup, the Vault base URL is available as VAULT_URL, the path to the Vault CA certificate as VAULT_CACERT, and the Vault namespace (if specified) as VAULT_NAMESPACE.
For example, this script obtains a JWT (JSON Web Token) from a service whose URL is provided in the Gateway setup and then requests a Vault token using that JWT and a Vault role which is also configured in the setup.
#!/bin/bash
# These environment variables must be defined in Gateway setup
# JWT_PROVIDER - the URL of the service which will provide the initial JWT
# ROLE_ID      - the Vault role to log in with

JWT=$(curl -s '$JWT_PROVIDER')
if [[ -z "$JWT" ]]; then echo "Could not obtain initial JWT"; exit; fi

RESPONSE=$(curl -s --cacert $VAULT_CACERT --data "{\"role\":\"$VAULT_ROLE\",\"jwt\":\"$MACHINE_TOKEN\"}" $VAULT_URL/v1/AD/auth/jwt/login)
if [[ -z "$RESPONSE" ]]; then echo "No response from Vault"; exit; fi

echo $RESPONSE
As another example, this script emulates the built-in AppRole support. It decodes the secret_id from a secure environment variable as documented at Decode encrypted environment variables.
#!/bin/bash
# These environment variables must be defined in Gateway setup
# keyfile  - the AES key file used by the Gateway
# roleId   - the Vault role to log in with
# (encrypted) secretId - the Vault secret associated with the role

if [[ ! -f $keyfile ]]; then echo "Can't find key file ($keyfile)"; exit; fi

if [[ -z "$VAULT_CACERT" ]]; then
cert_opt="--insecure"
else
cert_opt="--cacert $VAULT_CACERT"
fi

hex=${secretId#+encs+}
key=$(grep key $keyfile)
iv=$(grep iv $keyfile)
# Using perl to convert from hex to base64 because xxd might not be installed
secret=$(perl -MMIME::Base64 -e '$b=pack "H*","'$hex'"; print encode_base64($b)' | openssl enc -d -aes-256-cbc -K ${key#*=} -iv ${iv#*=} -a)
if [[ $? != 0 ]]; then echo "Can't decrypt secret"; exit; fi

RESPONSE=$(curl -s $cert_opt --request POST --data '{"role_id":"'$roleId'","secret_id":"'$secret'"}' \
$VAULT_URL/v1/auth/approle/login)
if [[ -z "$RESPONSE" ]]; then echo "No response from Vault"; exit; fi

echo $RESPONSE
Use external passwords Copied
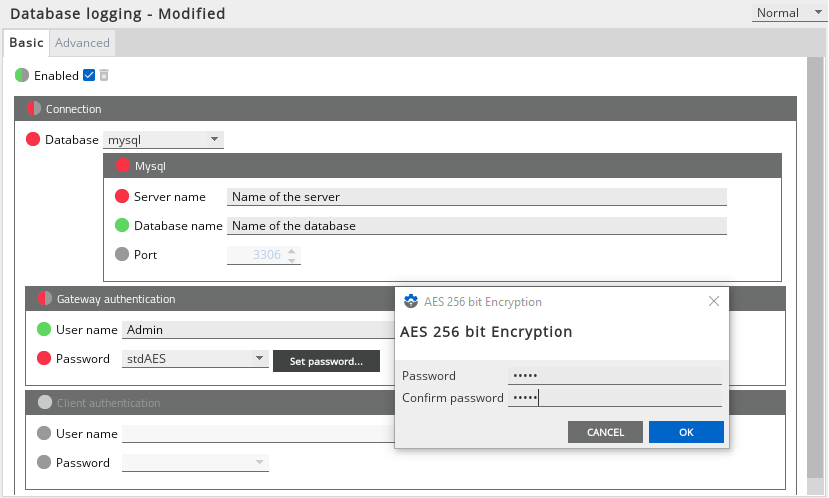
The Password drop-down list appears in various places throughout the Gateway Setup Editor where passwords are required, such as in Database logging > Gateway authentication and Database logging > Client authentication sections.

To use a password from an external provider:
- Navigate to the section where you need to configure a password.
- Select
extPwdfrom the Password drop-down list. - Specify the query associated with the required password. For more information about each supported password provider, see External passwords query syntax.
Note
When using CyberArk Multiple Central CP, each external password needs an additional key-value pair, where the key isGENEOS_PASSWORD_SERVERand the value is the name of a server (as defined in the Name field in the operating environment configuration). The external password will not be sent if this key is missing. When using CyberArk (Central CP), this key is treated like any other key and sent to the CyberArk server. - Click Validate current document
- Click Save current document
External password query syntax Copied
CyberArk password items Copied
The query string for a CyberArk item is a sequence of key-value pairs. For example:
Address=components;Username=svc_accountSafe=Test;Folder=root;Object=DemoPassword
If the query provided by your CyberArk administrator starts with Query= prefix, it should be omitted.
HashiCorp Vault password items Copied
The query string for a Vault item is similar to a URL path. Since the secret item stored at a Vault API path can contain multiple key-value pairs, the required key can be specified by appending # and the key name to the Vault API path. This is not required if the key name is password.
v1/secret/data/geneos/dblogging
In this example, the required key is password, so the query string is the Vault API path, without any leading /.
aws/creds/my-role#secret_key
Here, the Vault API path is aws/creds/my-role and the required key is secret_key.