Opsview 6.8.x End of Support
With the release of Opsview 6.11.0 on February 2025, versions 6.8.x have reached their End of Support (EOS) status, according to our Support policy. This means that versions 6.8.x will no longer receive code fixes or security updates.
The documentation for version 6.8.9 and earlier versions will remain accessible for the time being, but it will no longer be updated or receive backports. We strongly recommend upgrading to the latest version of Opsview to ensure continued support and access to the latest features and security enhancements.
Advanced automated installation
Overview Copied
An Advanced Automated Installation allows you to chose how you want to distribute the components, in order to achieve better scalability of the application for large deployments. For more information see Distributing Functionality.
A number of considerations:
- By default, the automated installation method will always install the latest available version of Opsview Monitor, downloaded from our repositories.
- By default, the automated installation method assumes you have a new operating system installation since the Opsview Monitor installation may overwrite or remove some existing packages and configuration(s).
- You should configure a hostname which can be resolved by the host’s DNS settings, for example
opsview.example.comshould resolve to the IP of the server. - For any server used during deployment, the system python alternatives will be modified during deployment. Additionally. if
/usr/bin/python2is not found (for Ubuntu 18, Centos 7, OL 7, and RHEL 7) or/usr/bin/python3is not found (for Ubuntu 20, Debian 10, OL 8, and RHEL 8), then python 2 or 3 will be installed respectively.
Prerequisites Copied
- A deployment host running an OS supported by the desired version of Opsview Monitor.
- Root access to the deployment host.
- The
rootuser must be able to runsudowithout a password on all servers in the Opsview deployment. - SSH access from the deployment host to all of the Opsview hosts:
- Authentication must use SSH public keys.
- The remote user must be
rootor havesudoaccess without password and without TTY or with a known password (do not use the account name opsview as this will cause an account clash).
- Firewall has been configured properly to allow Opsview Ports.
- For RHEL 7/8/9 systems, ensure the subscription manager is configured to allow system repositories. Verify that the
disable_system_reposoption is set to0in the/etc/dnf/plugins/subscription-manager.conffile on each system.
Note
We recommend you update all systems used during deployment to the latest OS packages before installing Opsview Monitor.
Installation checksum verification Copied
You can also verify the script before running it by comparing the checksum you get with.
curl -L https://deploy.opsview.com/6 > opsview_deploy
sha256sum opsview_deploy
Ensure the returned string matches the following:
cfc179fbcd8a8474a0e1c5bc4a239e0246fa801cd80b49a09dfbe1af39fdd5bc
Installation Copied
Run the following command to setup Opsview Monitor repositories on your server and install the opsview-deploy package:
curl -sLo- https://deploy.opsview.com/6 | sudo bash -s -- -A boot
Configuration Copied
Before configuring your deployment, review the example configuration files:
Note
YAML configuration files are sensitive to spacing. Do not use tabs when editing; use sequences of 2 spaces and ensure that the alignment is maintained.
host1:~# cd /opt/opsview/deploy

host1:/opt/opsview/deploy# ls -l etc/examples
-rw-r--r--  1 root root 1 Sep 28 00:00 opsview_deploy-01-xsmall.yml
-rw-r--r--  1 root root 1 Sep 28 00:00 opsview_deploy-02-small.yml
-rw-r--r--  1 root root 1 Sep 28 00:00 opsview_deploy-04-large.yml
-rw-r--r--  1 root root 1 Sep 28 00:00 opsview_deploy-05-xlarge.yml
The sizes associated with each of the example configuration files indicates the number of servers. For example, ‘01-xsmall’ is an ‘all-in-one’ Opsview installation.
For examples of the components roles and distribution, see the following page Distributing Functionality.
Configure xsmall YAML file Copied
The xsmall configuration, opsview_deploy-01-xsmall.yml, is for the minimal installation where all components (orchestrator, database, datastore, messagequeue, collector) are kept on a single server.
orchestrator_hosts:
  opsview-uk-mst:
    ip: 10.2.14.8
Configure small YAML file Copied
The small configuration, opsview_deploy-02-small.yml, has 2 collector servers, a database server, and orchestrator. The collector servers are configured under 2 different clusters.
orchestrator_hosts:
  opsview-uk-mst:
    ip: 10.2.14.8

collector_clusters:
  collectors-de:
    collector_hosts:
      opsview-de-1:
        ip: 10.12.0.9

  collectors-fr:
    collector_hosts:
      opsview-fr-1:
        ip: 10.7.0.9

database_hosts:
  opsview-uk-db:
    ip: 10.2.14.190
    # Override SSH username
    user: admin
Configure large YAML file Copied
The large configuration files, opsview_deploy-04-large.yml, has:
- orchestrator
- remote database
- 3 collector clusters (1 with dedicated messagequeue and datastore cluster)
- external messagequeue, datastore and registry cluster with 3x servers
- external results-processing servers
- external timeseries servers
orchestrator_hosts:
  opsview-uk-mst:
    ip: 10.2.14.8

#
# Opsview Collector Clusters
#
collector_clusters:
  collectors-de:
    collector_hosts:
      ov-de-1: { ip: 10.12.0.11 }
      ov-de-2: { ip: 10.12.0.12 }
      ov-de-3: { ip: 10.12.0.13 }
      ov-de-4: { ip: 10.12.0.14 }
      ov-de-5: { ip: 10.12.0.15 }
      ov-de-6: { ip: 10.12.0.16 }
      ov-de-7: { ip: 10.12.0.17 }
      ov-de-8: { ip: 10.12.0.18 }
      ov-de-9: { ip: 10.12.0.19 }

    datastore_hosts: &collectors_de_infra
      ov-de-infra-1: { ip: 10.12.0.31 }
      ov-de-infra-2: { ip: 10.12.0.32 }
      ov-de-infra-3: { ip: 10.12.0.33 }
    messagequeue_hosts: *collectors_de_infra

  collectors-fr:
    collector_hosts:
      ov-fr-1: { ip: 10.7.0.101 }
      ov-fr-2: { ip: 10.7.0.102 }
      ov-fr-3: { ip: 10.7.0.103 }

  collectors-it:
    collector_hosts:
      ov-it-1: { ip: 10.14.2.21 }
      ov-it-2: { ip: 10.14.2.22 }
      ov-it-3: { ip: 10.14.2.23 }

database_hosts:
  opsview-uk-db:
    ip: 10.2.14.190

registry_hosts: &shared_infra_hosts
  opsview-uk-infra-1:
    ip: 10.2.14.91
  opsview-uk-infra-2:
    ip: 10.2.14.92
  opsview-uk-infra-3:
    ip: 10.2.14.93

datastore_hosts:
  <<: *shared_infra_hosts

messagequeue_hosts:
  <<: *shared_infra_hosts

results-dispatcher_hosts: &shared_results_hosts
  opsview-uk-results-1:
    ip: 10.2.14.81
  opsview-uk-results-2:
    ip: 10.2.14.82
  opsview-uk-results-3:
    ip: 10.2.14.83

results-live_hosts:
  <<: *shared_results_hosts

results-performance_hosts:
  <<: *shared_results_hosts

results-recent_hosts:
  <<: *shared_results_hosts

results-snmp_hosts:
  <<: *shared_results_hosts

results-flow_hosts:
  <<: *shared_results_hosts

state-changes_hosts:
  <<: *shared_results_hosts

timeseries_hosts:
  opsview-uk-timeseries-1:
    ip: 10.2.14.91
Configure xlarge YAML file Copied
The xlarge configuration file, opsview_deploy-05-xlarge.yml, has:
- orchestrator
- remote database
- 3 collector clusters (1 with dedicated messagequeue and datastore cluster)
- dedicated messagequeue cluster
- dedicated datastore cluster
- dedicated registry cluster
- dedicated results-processing servers
- dedicated timeseries servers
orchestrator_hosts:
  opsview-uk-mst: { ip: 10.2.14.8 }

collector_clusters:
  collectors-de:
    collector_hosts:
      ov-de-1: { ip: 10.12.0.11 }
      ov-de-2: { ip: 10.12.0.12 }
      ov-de-3: { ip: 10.12.0.13 }
      ov-de-4: { ip: 10.12.0.14 }
      ov-de-5: { ip: 10.12.0.15 }
      ov-de-6: { ip: 10.12.0.16 }
      ov-de-7: { ip: 10.12.0.17 }
      ov-de-8: { ip: 10.12.0.18 }
      ov-de-9: { ip: 10.12.0.19 }

    datastore_hosts: &collectors_de_infra
      ov-de-infra-1: { ip: 10.12.0.31 }
      ov-de-infra-2: { ip: 10.12.0.32 }
      ov-de-infra-3: { ip: 10.12.0.33 }

    messagequeue_hosts: *collectors_de_infra

  collectors-fr:
    collector_hosts:
      ov-fr-1: { ip: 10.7.0.101 }
      ov-fr-2: { ip: 10.7.0.102 }
      ov-fr-3: { ip: 10.7.0.103 }

  collectors-it:
    collector_hosts:
      ov-it-1: { ip: 10.14.2.21 }
      ov-it-2: { ip: 10.14.2.22 }
      ov-it-3: { ip: 10.14.2.23 }

database_hosts:
  opsview-uk-db:
    ip: 10.2.14.190

registry_hosts:
  opsview-uk-registry-1: { ip: 10.2.14.121 }
  opsview-uk-registry-2: { ip: 10.2.14.122 }
  opsview-uk-registry-3: { ip: 10.2.14.123 }

datastore_hosts:
  opsview-uk-datastore-1: { ip: 10.2.14.111 }
  opsview-uk-datastore-2: { ip: 10.2.14.112 }
  opsview-uk-datastore-3: { ip: 10.2.14.113 }

messagequeue_hosts:
  opsview-uk-messagequeue-1: { ip: 10.2.14.101 }
  opsview-uk-messagequeue-2: { ip: 10.2.14.102 }
  opsview-uk-messagequeue-3: { ip: 10.2.14.103 }

bsm_hosts: &bsm_hosts
  opsview-uk-periodic-checks-1: { ip: 10.2.14.81 }
  opsview-uk-periodic-checks-2: { ip: 10.2.14.82 }
  opsview-uk-periodic-checks-3: { ip: 10.2.14.83 }

downtime-manager_hosts: *bsm_hosts

freshness-checker_hosts: *bsm_hosts

results-dispatcher_hosts: &shared_results_hosts:
  opsview-uk-results-1: { ip: 10.2.14.31 }
  opsview-uk-results-1: { ip: 10.2.14.32 }
  opsview-uk-results-1: { ip: 10.2.14.33 }
  opsview-uk-results-1: { ip: 10.2.14.34 }
  opsview-uk-results-1: { ip: 10.2.14.35 }

results-live_hosts: *shared_results_hosts

results-performance_hosts: *shared_results_hosts

results-recent_hosts: *shared_results_hosts

results-snmp_hosts: *shared_results_hosts

results-flow_hosts: *shared_results_hosts

state-changes_hosts: *shared_results_hosts

timeseries_hosts:
  opsview-uk-timeseries-1: { ip: 10.2.14.91 }
  opsview-uk-timeseries-1: { ip: 10.2.14.92 }
  opsview-uk-timeseries-1: { ip: 10.2.14.93 }
Modifications Copied
Once you are familiar with the configuration format, copy and edit the configuration file most similar to your environment:
host1:~# cd /opt/opsview/deploy

host1:/opt/opsview/deploy# cp -v etc/examples/opsview_deploy-02-small.yml etc/opsview_deploy.yml
'etc/examples/opsview_deploy-02-small.yml' -> 'etc/opsview_deploy.yml'

host1:/opt/opsview/deploy# edit etc/opsview_deploy.yml
Note
The YAML configuration files are sensitive to spacing. Do not use tabs when editing, use sequences of 4 individual spaces and ensure that the alignment is retained.
Change the hostname, the IP and optionally the username (do not use the account name opsview as this will cause a clash). For example:
---
orchestrator_hosts:
  opsview-uk-mst-hostname:
    ip: 10.2.14.8
    # Username to connect to remote host. If used, must have sudo root ability
    #user: admin
    # Set the remote user for SSH (if not default of 'root')
    #user: cloud-user
    # Set the remote port for SSH (if not default of port 22)
    #port: 9022
    # Add below if the server you are running opsview-deploy on is also the same server to deploy onto
    #vars:
    #  ansible_connection: local
Sudo Copied
If using a sudo user to SSH to the collectors, you may use the ansible “become” method to do so. The user you specify will then need to be listed within the /etc/sudoers file of the server you are accessing
orchestrator_hosts:
  opsview-uk-mst-hostname:
    ip: 10.2.14.8

collector_clusters:
  collectors-de:
    collector_hosts:
      ov-de-1:
        ip: 10.12.0.11
        user: <local_user_with_sudo_privilege>
        become: yes
        vars:
          ansible_become_method: sudo
          ansible_become_pass: <password_for_local_user_with_sudo_privilege>
The last line is not required when the user has the NOPASSWD option set in their sudoers entry.
Global overrides Copied
You need to configure global overrides by dropping user_*.yml configuration files in the /opt/opsview/deploy/etc/ directory.
You can find examples in /opt/opsview/deploy/etc/examples/.
For example:
#
# file: /opt/opsview/deploy/etc/user_vars.yml
#
---
# don't automatically upgrade OS packages to the latest available
opsview_manage_os_updates: False

# disable global TLS encryption
opsview_tls_enabled: False

# Relay host for the MTA. If set, all mail will be relayed via this host.
mta_relay_host: 'mail.opsview.com'
# Relay port for the MTA. If not set, port 25 will be used.
mta_relay_port: 123

# By default, an MTA is installed and configured on each host listed in
# `opsview_deploy.yml`. To disable this behaviour, set this to False.
opsview_manage_mta: True

# add custom mysql configuration - this writes to the file /etc/my.cnf.d/x91_opsview_extra.cnf
opsview_database_config_overrides:
  innodb_file_per_table: 1
  innodb_flush_log_at_trx_commit: 2
  query_cache_type: 0
  query_cache_size: 0

# Set the max_allowed_packet size in the database to 16M - do not use anything lower
# Configuration within "opsview_database_config_overrides" will take precendence over this value
opsview_database_max_allowed_packet: 16M

ov_component_overrides:
    # Change the initial state of Servicechecks when they are first added into the configuration
    service_check_defaults:
      state: 3
      output: 'Unknown - no results received'

# Increase the timeouts for various execution steps from the default of 60 seconds
  opsview_executor_config:
    execution_timeouts:
      service_check: 120
      service_check_slow: 240
      host_check: 120
      event_handler: 90
      send_notifications: 75
      instant_command: 120

# Self signed SSL certificates for accessing the UI via Apache will be created if the following is set and `opsview_tls_enabled` is 'True':
opsview_webserver_use_ssl: True
# If you need to specify your own SSL certifcicates you can instead use:
opsview_webserver_ssl_cert: /opt/opsview/webapp/etc/ssl/server.crt
opsview_webserver_ssl_key: /opt/opsview/webapp/etc/ssl/server.key

# Amending password strength requirements and add disallowed words
# Set the minimum password strength required for all new passwords:
# -  '1' (very weak; allows anything) through to '5' (very strong - at least 11-characters),
# -  "auto" (preserve the current setting, so that upgrades from < 6.5 will respect any current user configuration.
opsview_min_password_strength: 5
# A list of strings that will penalised the password strength if they are included in a user's password.
# This should include strings like the customer/company name and any other strings that should be disallowed from being included in users passwords
opsview_disallowed_passwords:
  - opsera
  - opsview
  - weivspo
# Number of historical passwords to validate any new password against
opsview_max_password_history: 4
InfluxDB Copied
At this point, if you want to use InfluxDB, add this to your /opt/opsview/deploy/etc/user_vars.yml:
# use InfluxDB instead of RRD
opsview_timeseries_provider: influxdb
If you have not installed the InfluxDB packages then install them now before continuing with Opsview Deploy; you must separately install InfluxDB as, unlike RRD, it is not bundled with Opsview Monitor. You can find information on how to do this for your platform in the InfluxDB documentation.
# create a fresh Opsview database in InfluxDB
curl -i -XPOST http://127.0.0.1:8086/query --data-urlencode "q=CREATE DATABASE opsview"
Secrets and credentials Copied
When the opsview-deploy package is installed, the secrets and credentials for the deployment should have been generated automatically.
You can re-generate this file if necessary.
Note
Regenerating the user_secrets for an existing deployment is not currently supported.
host1:~# cd /opt/opsview/deploy/

host1:/opt/opsview/deploy# cat etc/user_secrets.yml
---
opsview_core_secure_wallet_key: vnaXN6rYDcCRc0ey6Z7msNFaPZFm361r
opsview_database_password: zGcPneFL7m4lJF+Op3Q^982bHz
opsview_database_root_password: TVF2pUyVFQ3672If-P6,aIjJCy
opsview_datastore_encoder_key: dmJkbHRiOWxBdkJBTU9UTA==
opsview_datastore_password: XCejZK5OQYbCSW5ftIQLjWI7
opsview_erlang_cookie: Z1E9WfP0DgLGnmNrcpZZezko
opsview_loadbalancer_stats_password: fvPI6TvzyhN34wrbCrOZ19AX
opsview_messagequeue_encoder_key: OTZSWnVXR05DeE9LWm9NOA==
opsview_messagequeue_password: YP5enkvSYt8TsuCzFI1AUkKr
opsview_orchestrator_password: D7LVheXoz1tws3Sub81ieBdI
opsview_registry_password: UjIjSeXbwCXZnNzWWEPhPR1T
opsview_registry_root_password: wxP3XpEc5Hq6ASucbViV9m12
opsview_reporting_database_password: KPn+pTuSou2KSSF5Dodew+9Tt7
opsview_reporting_database_ro_password: 8R8It0irLjQ0oOWn.WwN5vC+eZ
opsview_servicedesk_database_password: 37Kn8^+DiJg3i1Uy3dFfbr93M3
opsview_session_manager_datastore_encoder_key: YlZKTHZxMzJiS3FXVVgwcg==
opsview_session_manager_datastore_salt: pF7SJsAxu1MHhb5dglV2OAWG
opsview_session_manager_http_server_admin_api_encoder_key: VzNtVHBOeVMzUjV6VXpEVg==
opsview_session_manager_http_server_password: 8HhekYwiEwyv0ZlGdXvwNBQg
opsview_session_manager_http_server_user_api_encoder_key: aGxaUlNvbWh5d24yRXdHQw==
opsview_timeseries_password: zo8pHiWQEVDfoUjoM6YfDLjt

host1:/opt/opsview/deploy# ./bin/gen_secrets > etc/user_secrets.yml
host1:/opt/opsview/deploy# chmod 0600 etc/user_secrets.yml

host1:/opt/opsview/deploy# cat etc/user_secrets.yml
---
opsview_core_secure_wallet_key: jR1TajCBjqSUl3KmvVCD8oOxUhSJ9fs0
opsview_database_password: e8Py3e,kj9YMUhxl0IhTV+7ctl
opsview_database_root_password: T^zrc7uJp4zVzQ7EDhM-177Bd9
opsview_datastore_encoder_key: c1FDdGNZVUdGaEp3OVZXaQ==
opsview_datastore_password: aBPo9ZsmGaBaEVYlcYslrgk6
opsview_erlang_cookie: Baf51KGymWHLTCNMHaKBG0c0
opsview_loadbalancer_stats_password: M66soMrcxH32ytvzwP40rdeF
opsview_messagequeue_encoder_key: dVNCRFczeUpRbmxYdTZKRg==
opsview_messagequeue_password: eqGfNvQ3Qztjq0VbsuXe0K47
opsview_orchestrator_password: X1GNGDQu9GEHUJT0AQIocwJT
opsview_registry_password: E04HxgfCRxCtcxzpPgHGU8Vg
opsview_registry_root_password: S4IjUi7SdaHvJvmsOlwpSI3u
opsview_reporting_database_password: K+pIvIPN,ORcTtyMwKn22IpUheM
opsview_reporting_database_ro_password: prr0XVg1WmleVztd5VnP_6_j4x
opsview_servicedesk_database_password: F25-RuPwKaBG_xgJ7ucbTqchuV
opsview_session_manager_datastore_encoder_key: eEJhRDNHUlh1YkNBaFJJZQ==
opsview_session_manager_datastore_salt: xClCrdDYEMPsVTl7BHE5FORR
opsview_session_manager_http_server_admin_api_encoder_key: NktPT0dWb3hIYjVYakllNA==
opsview_session_manager_http_server_password: 2xHN57kUy880d9neePgTwAiK
opsview_session_manager_http_server_user_api_encoder_key: bVRYRXhxOXdTY09rQmZkTg==
opsview_timeseries_password: W9qLPlQTdykqxGtgXrT0Hf8N
Pre-deployment checks Copied
Before running opsview-deploy, we recommend Opsview users to check the following list of items:
Manual Checks Copied
| What | Where | Why |
|---|---|---|
| All YAML files follow correct YAML format | opsview_deploy.yml, user_*.yml | Each YAML file is parsed each time opsview-deploy runs |
| All hostnames are FQDNs | opsview_deploy.yml | If Opsview Deploy can’t detect the host’s domain, the fallback domain ‘opsview.local’ will be used instead |
| SSH user and SSH port have been set on each host | opsview_deploy.yml | If these aren’t specified, the default SSH client configuration will be used instead |
| Any host-specific vars are applied in the host’s “vars” in opsview_deploy.yml | opsview_deploy.yml, user_*.yml | Configuration in user_*.yml is applied to all hosts |
| An IP address has been set on each host | opsview_deploy.yml | If no IP address is specified, the deployment host will try to resolve each host every time |
| All necessary ports are allowed on local and remote firewalls | All hosts | Opsview requires various ports for inter-process communication. See Opsview Ports |
For example:
---
orchestrator_hosts:
  # Use an FQDN here
  my-host.net.local:
    # Ensure that an IP address is specified
    ip: 10.2.0.1
    # Set the remote user for SSH (if not default of 'root')
    user: cloud-user
    # Set the remote port for SSH (if not default of port 22)
    port: 9022
    # Additional host-specific vars
    vars:
      # Path to SSH private key
      ansible_ssh_private_key_file: /path/to/ssh/private/key
Automated checks Copied
Opsview Deploy can also look for (and fix some) issues automatically. Before executing ‘setup-hosts.yml’ or ‘setup-everything.yml’, run the ‘check-deploy.yml’ playbook (this playbook will additionally set up Python on all systems used):
root:~# cd /opt/opsview/deploy
root:/opt/opsview/deploy# ./bin/opsview-deploy lib/playbooks/check-deploy.yml
If any potential issues are detected, a “REQUIRED ACTION RECAP” will be added to the output when the play finishes.
The automatic checks look for:
| Check | Notes or Limitations | Severity |
|---|---|---|
| Deprecated variables | Checks for: opsview_domain, opsview_manage_etc_hosts | MEDIUM |
| Connectivity to EMS server | No automatic detection of EMS URL in opsview.conf overrides | HIGH |
| Connectivity to Opsview repository | No automatic detection of overridden repository URL(s) | HIGH |
| Connectivity between remote hosts | Only includes LoadBalancer ports. Erlang distribution ports, for example, are not checked | MEDIUM |
| FIPS crypto enabled | Checks value of /proc/sys/crypto/fips_enabled | HIGH |
| SELinux enabled | SELinux will be set to permissive mode later on in the process by setup-hosts.yml, if necessary | LOW |
| Unexpected umask | Checks umask in /bin/bash for ‘root’ and ’nobody’ users. Expects either 0022 or 0002 | LOW |
| Unexpected STDOUT starting shells | Checks for any data on STDOUT when running /bin/bash -l |
LOW |
| Availability of SUDO | Checks whether Ansible can escalate permissions (using sudo) | HIGH |
| OS updates | Checks for opsview_manage_os_updates != True as OS updates are not done by Opsview any more | MEDIUM |
When a check is failed, an Action is generated. Each of these actions is formatted and displayed when the play finishes and, at the end of the output, sorted by their severity.
The severity levels are:
| Level | Meaning |
|---|---|
| HIGH | Will certainly prevent Opsview from installing or operating correctly |
| MEDIUM | May prevent Opsview from installing or operating correctly |
| LOW | Unlikely to cause issues but may contain useful information |
By default, the check_deploy role will fail if any actions are generated MEDIUM or HIGH severity. To modify this behaviour, set the following in user_vars.yml:
# Actions at this severity or higher will result in a failure at the end of the role.
# HIGH | MEDIUM | LOW | NONE
check_action_fail_severity: MEDIUM
The following example shows the 2 MEDIUM severity issues generated after executing check-deploy playbook
REQUIRED ACTION RECAP **************************************************************************************************************************************************************************************************************************

[MEDIUM -> my-host] Deprecated variable: opsview_domain
  | To set the host's domain, configure an FQDN in opsview_deploy.yml.
  |
  | For example:
  |
  | >>  opsview-host.my-domain.com:
  | >>    ip: 1.2.3.4
  |
  | Alternatively, you can set the domain globally by adding opsview_host_domain to your user_*.yml:
  |
  | >>  opsview_host_domain: my-domain.com

[MEDIUM -> my-host] Deprecated variable: opsview_manage_etc_hosts
  | To configure /etc/hosts, add opsview_host_update_etc_hosts to your user_*.yml:
  |
  | >>  opsview_host_update_etc_hosts: true
  |
  | The options are:
  | - true   Add all hosts to /etc/hosts
  | - auto   Add any hosts which cannot be resolved to /etc/hosts
  | - false  Do not update /etc/hosts


Thursday 21 February 2019  17:27:31 +0000 (0:00:01.060)       0:00:01.181 *****
===============================================================================
check_deploy : Check deprecated vars in user configuration ------------------------------------------------------------------------------------------------------------------------------------------------------------------------------ 1.06s
check_deploy : Check for 'become: yes' -------------------------------------------------------------------------------------------------------------------------------------------------------------------------------------------------- 0.03s

*** [PLAYBOOK EXECUTION SUCCESS] **********
Migration note Copied
Warning
If you are building new servers for a migration deployment of 6.x as part of a migration, do not run the deployment steps below or setup-everything yet. The below links will point you towards the appropriate migration pages for the version you are migrating from Opsview Monitor 6.x.
Deployment Copied
To deploy Opsview on the target infrastructure:
host1:~# cd /opt/opsview/deploy/

# configure the base hosts
host1:/opt/opsview/deploy# ./bin/opsview-deploy lib/playbooks/setup-hosts.yml

# install and configure the core infrastructure (database, datastore, messagequeue, etc)
host1:/opt/opsview/deploy# ./bin/opsview-deploy lib/playbooks/setup-infrastructure.yml

# install and configure the opsview
host1:/opt/opsview/deploy# ./bin/opsview-deploy lib/playbooks/setup-opsview.yml

# configure monitoring of the Orchestrator and any Collectors
host1:/opt/opsview/deploy# ./bin/opsview-deploy lib/playbooks/setup-monitoring.yml
Webserver SSL Certificate Copied
In Opsview 6 we now provide a location to drop in SSL Certificates for use in encrypting traffic between the users and the Web UI. To use your own trusted SSL key and certificate instead of the generated self-signed ones, you must copy your certificate and key file into /opt/opsview/webapp/etc/ssl/. The default name for these files is server.key and server.crt.
As root, move your SSL certificates into the correct location while backing up the generated self signed ones:
Note: these steps assume you have just placed your server certificates into root’s home directory, your location and filenames may be different, so change ~/myserver.crt and ~/myserver.key accordingly.
cd /opt/opsview/webapp/etc/ssl/
mv server.crt{,_selfsigned}
mv server.key{,_selfsigned}
mv ~/myserver.crt ./server.crt
mv ~/myserver.key ./server.key
/opt/opsview/watchdog/bin/opsview-monit restart opsview-webserver
If you desire to change the SSL configuration such as the use of intermediate CA certificates, the use of .pem files or simply changing the location of the files then please see opsview-web-app for more information.
Logging in Copied
During the installation, a single administrative user will have been created. The credentials for this user are:
username: admin
password: initial
The password for the admin user may be changed after logging into the UI by following the steps on Changing Opsview Monitor Passwords.
After the system is activated, carry out a reload by navigating to Configuration > [System] > Apply Changes and pressing the Apply Changes button.
Post-installation Copied
After the deployment process has ended, plugins need to be synced to collectors. This can be done by running:
host1:/opt/opsview/deploy# su - opsview -c '/opt/opsview/coreutils/bin/import_all_opspacks -f'
host1:/opt/opsview/deploy# ./bin/opsview-deploy lib/playbooks/sync_monitoringscripts.yml
If you are carrying out the installation as a user with sudo privileges, please refer to the (Known issues) page in order to complete the above step.
Create new hosts Copied
By default, only the Orchestrator and any Collectors are added as Hosts. To monitor the other machines in the setup (such as database or timeseries servers), first Create Hosts.
With the Host details set up, the appropriate Host Templates need to be added to the server. To see what components are running on the machine:
- Go to Configuration > My System, and then click the System Overview tab.
- Add the matching Host Templates for each component listed for the Host currently being added.
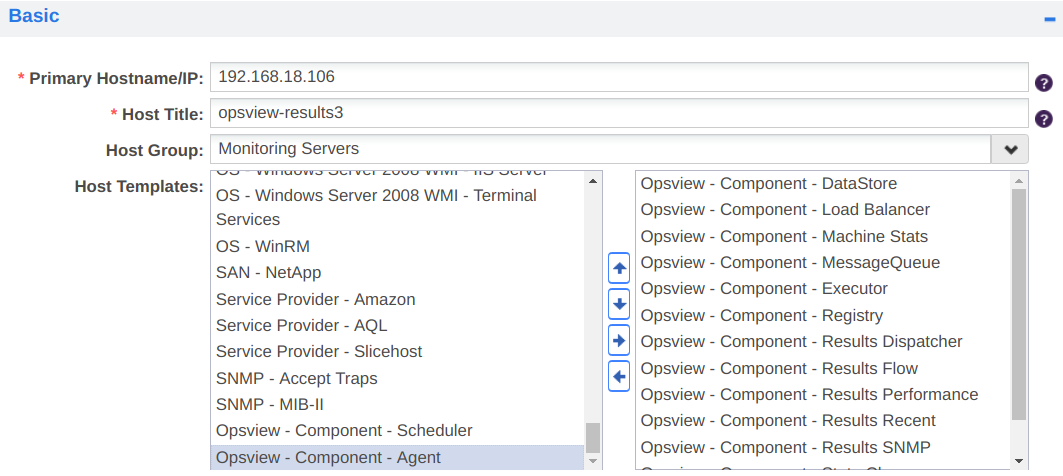
- Go to the Variables tab on the New Host modal and add Variables for the components added above. Load Balancers and MessageQueue Service checks need
OPSVIEW_LOADBALANCER_CREDENTIALSandOPSVIEW_MESSAGEQUEUE_CREDENTIALSdetails to match their password (as generated in/opt/opsview/deploy/etc/user_secrets.yml).- If
OPSVIEW_DATASTORE_SETTINGSis configured, Node should be set to couchdb@hostname where hostname is the full hostname. This can be found with hostname-fon Linux machines. Password should also match the password found inuser_secrets.yml. - If
OPSVIEW_MESSAGEQUEUE_CREDENTIALSis configured, the Node Name should be set to rabbit@hostname where hostname is the full hostname. This can be found with hostname-fon Linux machines. - An
OPSVIEW_LOADBALANCER_PROXYvariable is needed for every proxy set up on the Machine. To find the names of the proxies registered, the following bash command will return the names. Note, only the names of the files should be added as variable values, omit the file extension.
- If
ls /opt/opsview/loadbalancer/etc/ | grep ".*balance.cfg"
- Repeat the above steps for all machines used in the hosting of Opsview, then edit the hosts (orchestrator and registered clusters) that were generated by the install to remove all unnecessary service checks and setup the variables and host templates for the ones needed in the same way as above.
Moving database Copied
If you wish to move your database to an infrastructure server after the installation is complete, refer to Moving database.
Problems with installations Copied
If you encounter any problems with the installation, it is safe to rerun the command again.
You are also able to continue the installation from a checkpoint for the following reasons:
- Cancelled installations, which can be done by pressing CTRL+C>.
- Failed installations, for example, a network connection failure.
The automated installation consists of 5 steps that can be partially executed:
| Step name | Description | Output from Automated Installation script |
|---|---|---|
| repo | Add Opsview package repository | [*] Adding the Opsview package repository |
| boot | Install and configure our deploy tool | [*] Installing Opsview Deploy |
| fire | Configure the firewall rules for the Web UI. For a full list of ports and extra manual firewall rules you need, see List of Ports | [*] Adding HTTP/HTTPS rules to the local firewall |
| inst | Use the deploy tool to install Opsview | [*] Running Opsview Deploy |
With that in mind, we can then use the -A and -O flags to install up to a certain step or install only that step respectively. While the examples before would run all the five steps in order, this one would rerun all 5 steps:
curl -sLo- https://deploy.opsview.com/6 | sudo bash -s -- -A inst
This second example would just run the firewall step:
curl -sLo- https://deploy.opsview.com/6 | sudo bash -s -- -O fire
If you entered your software key incorrectly (which will fail at the _inst_ step), the command below will remove the incorrect key, re-create the configuration file and re-run the installation:
sudo rm /opt/opsview/deploy/etc/user_vars.yml
curl -sLo- https://deploy.opsview.com/6 | sudo bash -s -- -p PASSWORD -s SOFTWARE_KEY -y -O boot,inst