Gateway Setup Editor
Introduction Copied
Gateway Setup Editor (GSE) is a standalone Java and C++ application which allows you to edit the setup of the Gateway. This document is a reference guide which will step you through the major components.
This document assumes the user has a basic understanding of the Geneos framework. It guides you through the fundamental principles behind the GSE interface and its main components.
Licensing Copied
The GSE is part of the Geneos Framework. If you have a licence for Geneos you can deploy as many GSE’s as you like within the group or organisation that has the licence.
Glossary of terms Copied
| Term | Description |
|---|---|
| GSE | Gateway Setup Editor. |
| Named item | Refers to any item in the setup that can be named, and referred to. Examples include Probes, Samplers and variables. |
| GA Version | General Availability. Geneos products that are in Beta or production are said to be GA's. They have been tested internally by ITRS. |
| RA Version | Restricted Availability. Geneos products that have not been tested, and are considered pre Alpha |
General Overview Copied
Starting Gateway Setup Editor Copied
There are two ways to start the Gateway Setup Editor (GSE):
Standalone Copied
Note: Beginning Geneos 5.5.x, the Managed Entity display name is used in the user readable paths throughout the Gateway Setup Editor, except when the GSE is opened as a standalone application. This only applies if you open the GSE within the Active Console. To start the GSE standalone, run the GatewaySetupEditor.exe located in the directory you installed or unzipped the files in.
There are a number of start-up flags and settings you can define which modify the behaviour and configuration of the GSE while it is running. These settings are configured by modifying the GatewaySetupEditor.gci file that resides in the same directory as the GatewaySetupEditor.exe. For a complete list of these flags, and details of how to change this file, see Start up settings.
On Windows, the GSE uses a single GatewaySetupEditor.gci regardless of whether the GSE is opened from the Active Console, or as a standalone application.
On macOS, the GSE uses two separate GatewaySetupEditor.gci files:
- If opened from the Active Console, the GSE uses the
GatewaySetupEditor.gcifrom the Active Console directory. - If opened as a standalone application, the GSEuses the
GatewaySetupEditor.gcifrom the Gateway Setup Editor directory.
From the Active Console Copied
The GSE can run from within the Active Console.
To launch the GSE without opening a setup, go to Tools > Gateway Setup Editor.
To open an existing Gateway configuration, use one of the following methods:
- Select Configure gateway from the toolbar, then select a Gateway and press OK.
- Right-click a Gateway and select Configure gateway.
- Double-click a Gateway in the Gateways view.
When you run the GSE from the Active Console, it adopts all the arguments passed to the Active Console from the ActiveConsole.gci file.
The GSE can be configured to launch as a separate process from the Active Console using the Gateway setup editor as a separate process advanced setting. See .
Open, save, and close Gateway setups Copied
Gateway setups can be edited in two modes:
- From disk.
- Via a Gateway.
Open Gateway setup files from disk Copied
Gateway setup files are XML files, and can be opened from any accessible file location. To do this , go to File > Open or use the ‘Open Document’ button on the toolbar, and select a path using the file open dialog.
Alternatively, you can Drag and Drop a file from external programs, such as Windows Explorer.
Note
Files edited from disk do not benefit from Gateway related features, such as Gateway validation and file locking. The setup is also not applied to the Gateway automatically.
Open Gateway setups via a Gateway Copied
When running the GSE standalone you can open a setup directly via a Gateway connection. The GSE can request the setup from a Gateway for editing, and then send the setup back to the Gateway to be applied.
To open a Gateway setup, you must connect to the Gateway:
- Go to File > Connect, or click the Connect to Gateway on the toolbar. This opens the connection dialog.
- Use the drop-down to select the Logon type.
- In Host, enter the host or IP address of the Gateway.
- In Port, enter the port of the Gateway.
- If it is a secure connection, tick the box by Secure.
- Press OK.
The editor attempts to connect to the Gateway and requests the setup.
If successful, a new Gateway entry is added to the Gateways view.
To remove a Gateway connection, see Removing gateway connections.
Save and close setups Copied
How to save a setup Copied
To save a setup, do any of the following:
- Go to File >Save in the menu.
- Press Save current document on the main toolbar.
- Press
Ctrl+Son your keyboard.
Before saving the document, the editor performs a Schema validation (See Error’s view). If there are any errors, you will see this dialog:
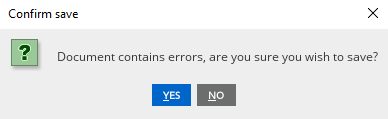
- If you select Yes, the document is saved.
- If you select No, the save is cancelled.
Note
If the setup has not been changed the save button and menu item remain inactive.
To save a copy of the setup to disk, use either File > Export or File > Save As. See The menu structure for more information.
How to close a setup Copied
To close a setup, do any of the following:
- Select File > Close in the menu.
- Right- click on the document tab and select Close.
- Press
Ctrl+F4on your keyboard.
If a setup has been changed, this dialog appears on the screen:
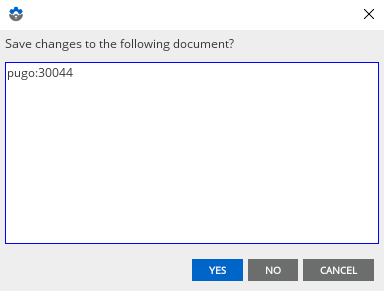
- If you select Yes, the document is saved and then closed.
- If you select No, the document is saved, and any changes are discarded.
- If you select Cancel, the document remains open.
The Application window Copied
An example of the main application window is shown in below:
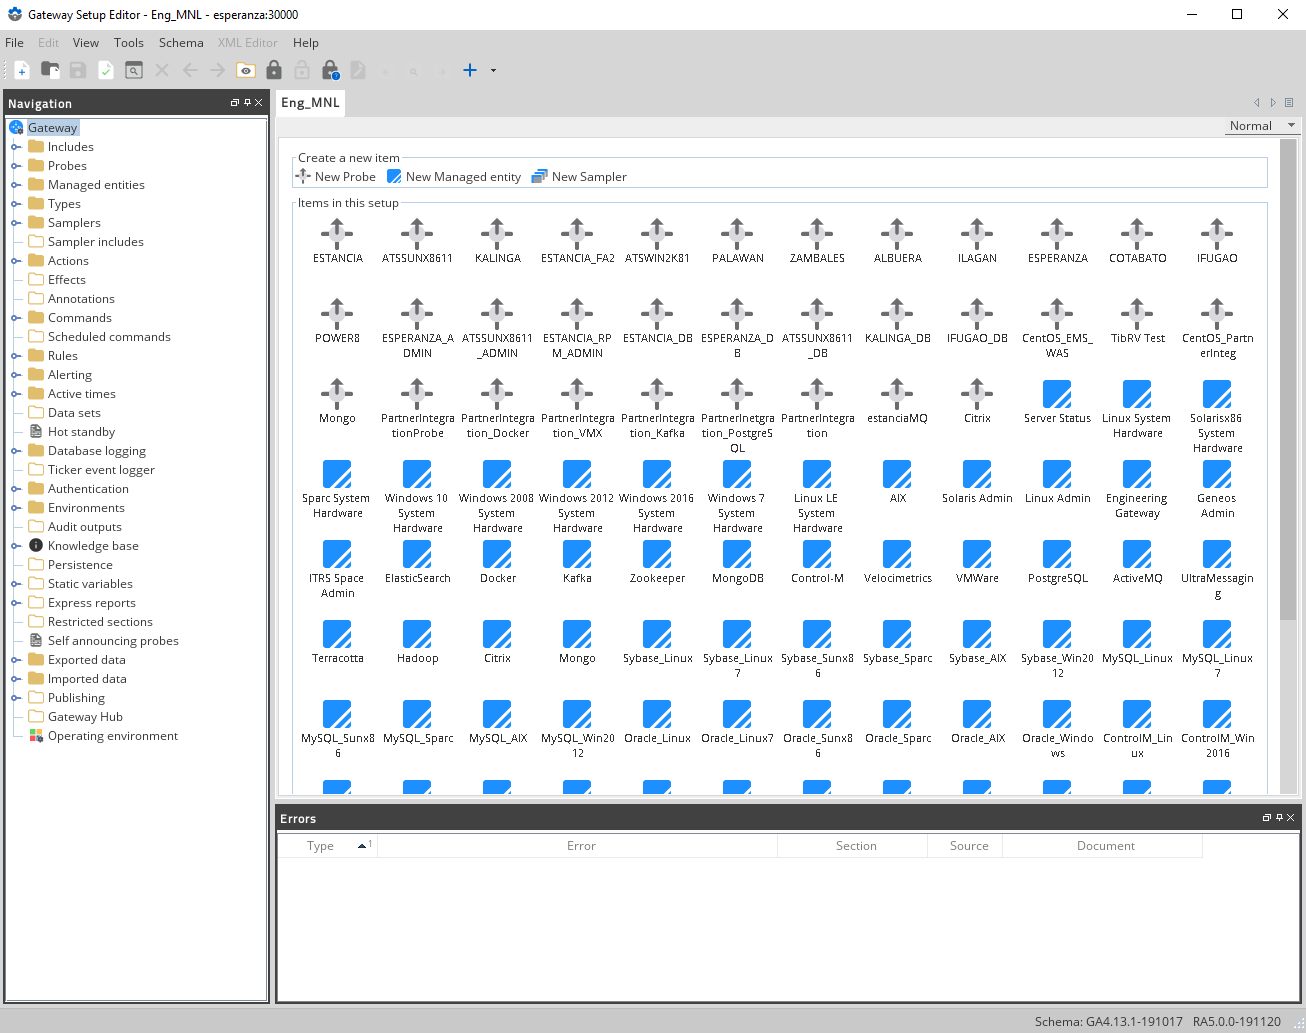
There is a menu and a tool bar, the contents of which are detailed below. It also has a set of components which are used to view and manipulate the contents of gateways setup files. All the components reside in dockable frames (see section Gateway Setup Editor) which can be dragged around the application window or undocked (floated in their own window)
The list of components in the GSE is detailed in section Gateway Setup Editor.
At any given time only a single dockable component is selected. This is indicated by giving it a different colour heading to the other visible components.
The status bar Copied
The status bar (at the bottom of the main application window) displays the build number (version) of the GSE, and the schema version when a document is active.

General interface standards and conventions Copied
This section outlines some general standards and tips and tricks in the GSE interface.
Beginning Geneos 5.8.x, the undo and redo key functions, CTRL + Z and CTRL + Y, are supported in Active Console and Gateway Setup Editor for the following: text fields, multiline texts, and editable drop-down fields.
The menu structure Copied
The following menu options are available in GSE:
- File
- New — Create new setup file.
- Open — Open an existing setup file from disk.
- Close — Close the current setup file.
- Connect — Connect to a Geneos Gateway.
- Save — Save the current file.
- Save as — Save to a new location on disk and continue editing that file. All passwords that are not plaintext are removed from the saved file. This drops the current Gateway connection.
- Export — Export copies of the main setup file and all loaded include files to a new location on disk. All passwords that are not plaintext are removed from the saved file. After exporting, you are continuing to edit the setup of the connected Gateway.
- Replace contents — Replace the active document with the contents of another setup from disk.
- Reload — Reload the current document. This will revert to the last save point.
- Load all includes — Load all the included files, except for disabled remote include files.
- Load running setup — Open a read-only copy of the current setup of the connected Gateway in a new editor tab.
- Exit — Exit the setup editor.
- Edit
- Copy — Copy the current selection in the navigation.
- Paste — Paste a previously copied item into the current selection in the navigation.
- Rename — Rename the current selection in the navigation (Named items only).
- Delete — Delete the current selection in the navigation.
-
View
- Show/Hide empty sections — Toggles the ‘show’ mode of the navigation tree.
- Back — Moves back in the navigation tree history.
- Forward — Moves forward in the navigation tree history.
- Search results — Shows the Search results dockable.
- Errors — Shows the errors dockable.
- Navigation — Shows the Navigation dockable.
-
Schema
- Switch… — Switch the schema for the current document to a specific schema.
- Switch to working schema — Switch to the ‘working’ schema, after having used ‘Switch schema’.
-
Tools
-
Search — Opens the search dialog.
-
Advanced Search — Opens the advanced search dialog.
-
Validate — Validates the current document.
-
Lock* — Sends a request to lock the current document.
-
Force Lock* — Sends a request to force lock the current document.
-
Unlock* — Sends a request to unlock the current document.
-
Force Unlock* — Sends a request to force unlock the current document.
-
Get Lock information* — Sends a request for lock information about the current document.
-
Add Self Announce Probes — Adds the Self Announcing Probe in the navigation dockable.
Note
These items are only available when editing a file through a Gateway connection.
-
-
XML Editor
- Format** — Format the XML
- Revert** — Revert the XML to the first state
- Find…** — Show the find dialog for the XML Editor
- Apply** — Apply the XML to the document
Note
These items are only active when an XML Editor is enabled.
-
Help
- Geneos Online Documentation — Opens a browser window and takes you to the online documentation.
- About — Launches the ‘About’ dialog. From this you can also create a diagnostic file to send to ITRS Support in the case of problems. See section Start up settings.
The Toolbar Copied
The toolbar contains the functions:

- New document

- Open document

- Save current document

- Validate current document

- Search

- Delete selection

- Back

- Forward

- Show/Hide the empty sections in the navigation tree

- Lock the current document

- Unlock the current document

- Get lock information on the current document

- Format XML

- Revert

- Find

- Apply

- Create a new named item

Component List Copied
The GSE is composed of a number of components (or views). They can be accessed via the View menu in the application menu bar. Each component is contained in its own dockable frame (see section Gateway Setup Editor). The available components are summarised here, and discussed in detail in the following sections:
- Navigation - Shows the main sections and items in the setup, and controls the Settings editor of the current document
- Errors View - Shows a list of validation errors for the current document
- Search Results - Shows the search results for the last executed search
- Gateways View - Shows any connected gateways
- The Document Area - Shows all the open documents
- Settings Editor - Shows the selected section for editing
Icons and colours Copied
The GSE uses icons to represent various types of data in a setup:
| Named Item | Section | Icon | Icon |
|---|---|---|---|
| Probe | Probes |

|
|
| Managed entity | Managed entities |

|
|
| Type | Types |

|
|
| Sampler | Samplers |

|
|
| Action | Actions |

|
|
| Command | Commands |

|
|
| Schedules command | Schedules commands |

|
|
| History period | Rules |

|
|
| Rule | Rules |

|
|
| Active time | Active times |

|
|
| Table | Database logging |

|
|
| Item | Database logging |

|
|
| User | Authentication |

|
|
| Group | Authentication |

|
|
| Environment | Environments |

|
|
| Audit output | Audit outputs |

|
|
| URL template | Knowledge base |

|
|
| KBA set | Knowledge base |

|
|
| FKM Table | Static variables |

|
|
| GL-names | Static variables |
|
|
| RMC templates | Static variables |
|
|
The Navigation Dockable Copied
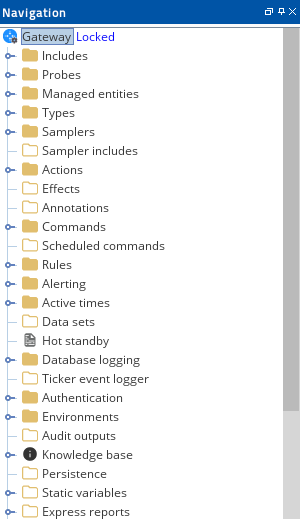
The navigation view is the main interface for moving around setups.
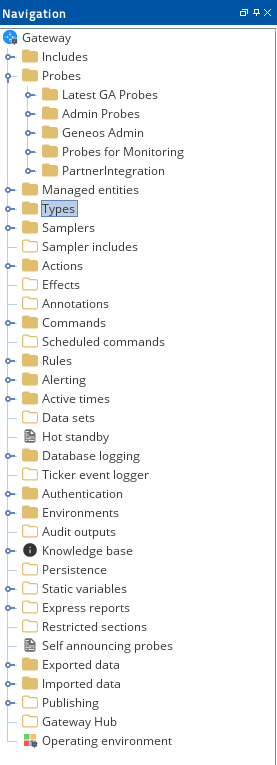
Navigation icons Copied
The navigation uses icons to indicate the state and type of parts of the setup.
| Icon | Description |
|---|---|
|
|
Indicates a section that exists in the setup |

|
Indicates a section that has not been created |
|
|
Indicates a 'Named item'. Examples of named items are detailed in the 'Glossary of terms' |
Modify the setup using the navigation Copied
How to create sections Copied
To create a section that has not been created, click Actions > New Action ![]() in the Navigation section.
in the Navigation section.
How to create named items Copied
Named items can be created in many different sections in the setup. To create a named item, right- click on a section to show the context-sensitive menu. Select the type of item you wish to create. The items will be added at the bottom of the section, and the item will be loaded into the settings editor.
How to change the name of named items Copied
To change the name of a named item, you can do any of the following:
- Right-click on the item and choose Rename.
- Double-click the item.
- Select the item and press
F2.
The item text will become editable, and the text can be changed
To commit the changes you have made, press Enter , or click somewhere else in the editor. To revert the change, press Escape on keyboard.
How to change the order of named items Copied
Named items can be moved within each section. To move an item up or down, right click on the item you wish to move, and select Move up or Move Down. Alternatively you can use Alt+↑ or Alt+↓ respectively.
You can also sort named items alphabetically in a section, by right clicking on a section and selecting Sort -> Ascending or Sort -> Descending.
How to delete sections and named items Copied
To delete any section, you can do any of the following:
- Right-click on the item and select Delete.
- Press the Delete selection button in the toolbar.
- Press
Deleteon your keyboard.
Note
This will delete the section and all the items inside the section.
How to move named items Copied
The order of the sections is fixed, however ‘Named Items’ can be moved around in the setup within each section.
Some named items can be moved within a section or to other sections by using drag and drop:
- Drag the item in question to the target section. If the item cannot be moved to the section, the cursor changes to indicate the move is not permitted.
- If you drag using the right mouse button, you are presented with a context menu when you release the button:
- Select Move Here to move node, or Cancel to abort the move.
How to copy named items Copied
There are several ways to copy named items within a section or to other valid sections:
- Clicking using your mouse:
- Right-click the item and select Copy.
- Right-click on the target location and select Paste.
Note
Paste only shows if the target location is valid for the copied item.
- Dragging and dropping using your mouse:
- Drag the item in question to the target section using the right mouse button.
- If the item cannot be copied to the section, the cursor will change to indicate the move is not permitted.
- Select Copy Here to copy the item, or Cancel to abort.
- Drag the item in question to the target section using the right mouse button.
- Using your keyboard:
- Select the item you wish to copy, and press
Ctrl+C. - Select the target node and press
Ctrl+V.
- Select the item you wish to copy, and press
When copying a Named item as a child of the same parent, the editor changes the name of the new item to ‘Copy of
If this name already exists, the editor appends a number on the end (1, 2, 3 etc) until it finds a name that is not in use.
Note
The option for Move Here does not appear if you are dragging a named item to its immediate parent.
How to copy named items via the system clipboard Copied
When you right click a named item, there is also a Copy XML option. This copies the XML representation of the item (as you would see in the XML editor) to the system clipboard. This is the same as if you opened the item in the XML editor, pressed Ctrl+A (Select All), and then Ctrl+C. You can also do this by selecting an item and pressing Crtl+Shift+C.
If the system clipboard contains well-formed XML representing a single named item and you select a section or item that is a valid parent for that item, the right-click menu contains a Paste XML item and the Ctrl+Shift+V keyboard shortcut is enabled. If you use the Paste XML menu item or Ctrl+Shift+V shortcut, a named item will be created using the clipboard content.
If the name specified for the item in the XML already exists, a number will be appended to make the name unique.
If the XML used contains errors (well-formed XML but not valid according to the schema), these will be indicated in the same way as if invalid XML had been entered into the XML editor.
Note
Copy XML and Paste XML are only provided for named items, not for top-level sections such as ‘Samplers’ or ‘Rules’. You can only copy or paste one item at a time as XML.
The XML which is copied and pasted is a single element, not a complete XML document - it does not start with <?xml version="1.0" encoding="ISO-8859-1"?>.
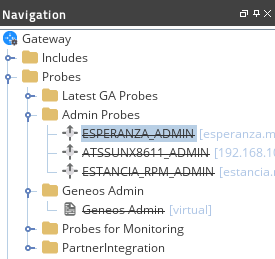
How to disable and enable named items Copied
Named items in the setup can be disabled. When a named item is disabled, the Gateway ignores it. Disabling named items allows you to remove it from the setup without deleting it.
To disable an item in the navigation, right-click on the item and select Disable. Alternatively, select the item and press Ctrl+D on the keyboard.
To enable an item in the navigation, right-click on the item and select Enable. Alternatively, select the item and press Ctrl+D on the keyboard.
Disabled items are displayed as strikethrough text in the Navigation section:
How to re-encrypt AES passwords encrypted with a previous key file Copied
If the main setup or some include files still have AES passwords that were encrypted with the previous key file of the Gateway, then you can do the following to replace these AES passwords that are encrypted with the Gateway current key:
- To re-encrypt AES passwords in the main setup, right-click Gateway in the topmost level of the navigation tree, then select Re-encrypt AES passwords.
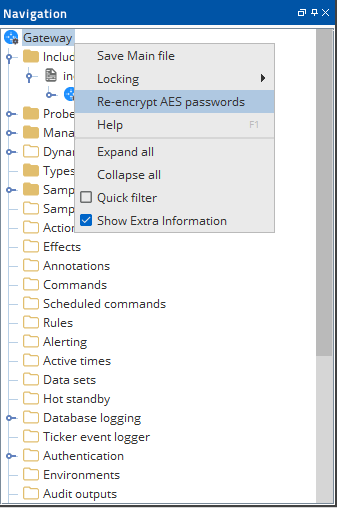
- To re-encrypt AES passwords in an include file, load the include file if it has not been loaded yet, then right-click Gateway under the include file, then select Re-encrypt AES passwords.
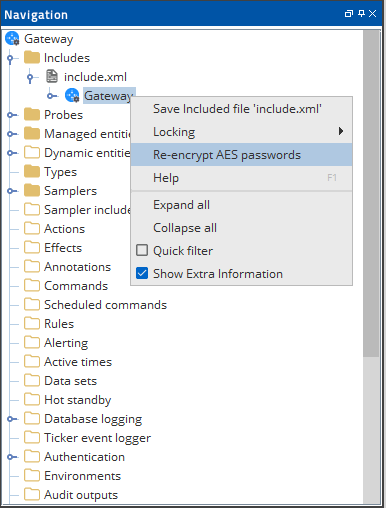
Re-encrypting the AES passwords in the main setup or in an include file will update the loaded document in the GSE and it can then be validated and saved using the normal GSE functions.
Note
The Re-encrypt AES password option will only appear in the context menu if the Gateway is run with the-previous-key-fileoption.
Password removal on copying Copied
When copying named items, any passwords (for example, within Sampler or Type definitions) are removed from the copy. This includes any of the following methods:
- Right-clicking an item and selecting Copy.
- Right-clicking an item and selecting Copy XML.
- Dragging and dropping an item with the right mouse button and selecting Copy Here.
- Using
Ctrl+Con your keyboard.
The methods above usually result in validation errors until each password is re-entered, or the password setting is removed from the copied item.
Passwords are not removed when an item is moved by any of the following methods:
- Right-clicking an item and selecting Cut.
- Dragging and dropping an item with the left mouse button.
- Dragging and dropping an item with the right mouse button and selecting Move Here.
- Using
Ctrl+Xon your keyboard.
Other Navigation features Copied
Quick Filter Copied
The quick filter allows you to hide items, or filter them out.
To enable the quick filter, right-click on the navigation and select ‘Quick Filter’. The filter appears at the top of the component:
Simply type some text into the text field, and the tree will be filtered according to the text:
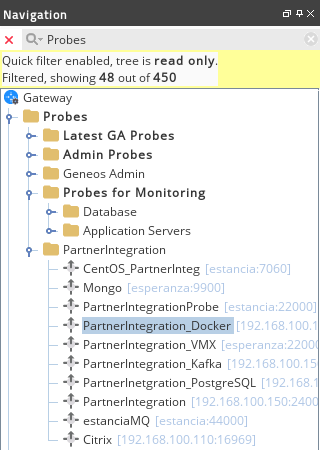
The tree will hide any items that do not match the text and do not contain any items that match the text. Items that do match will be in bold.
To disable filtering, press the red cross button to the left of the filter, or right click on the tree and select ‘Quick Filter’.
Note
The tree becomes read only when filtering is enabled; you will not be able to change, move or delete any items in the tree.
Error Highlighting Copied
When you perform a validate command (See Errors Dockable), the location of the errors will be highlighted in the navigation:
Any node highlighted indicates an error in that section, or an error in some child section. In the above diagram, ‘ProbeWithErrors’ has an error, so all of its parent nodes are highlighted.
The Errors Dockable Copied
The Errors Dockable lists validation errors generated by the GSE, Gateway, and Centralised Configuration. To generate a list of errors, either:
- Select Tools > Validate.
- Click Validate current document
in the toolbar.
Saving the current document also runs the validation process.
Error types Copied
There are three types of errors:
| Type | Icon | Description | Example |
|---|---|---|---|
| Warning |
|
Indicates that a part of the setup may be invalid, but the problem is not serious enough to prevent other parts of the setup from working. | Appears when you create a managed entity with no samplers. |
| Error |
|
Indicates an error in a section that might prevent this section from working correctly. | Appears when you create a managed entity without specifying the probe that it should run on. |
| Critical |
|
Indicates an error that will prevent the whole setup from working. | Appears when you create a malformed XML in the XML editor. |
Validation types Copied
There are two types of validations that the Gateway Setup Editor performs:
| Validation type | Description |
|---|---|
| Schema validation | These are errors validated against the schema. The schema includes information about data types, but not relationship between sections. This is a type of validation that always occurs. |
| Gateway validation |
The Gateway processes the setup and generates errors based on the data. This includes checking the relationship between sections. This type of validation occurs when:
|
The error table Copied
The errors are displayed in a table format. The list contains all errors including the errors generated by Centralised Configuration which can be filtered out.
| Filter | Description |
|---|---|
| Follow selection | When you navigate between sections in the Navigation tree, only the errors applicable to that section or item are displayed. |
| Merge duplicates | Merges all duplicated errors that come from multiple sources. This is applicable when Central Configuration is used and validation is carried out across multiple sources. |
| Connected Gateway only |
Only shows the errors for the locally connected Gateway. |
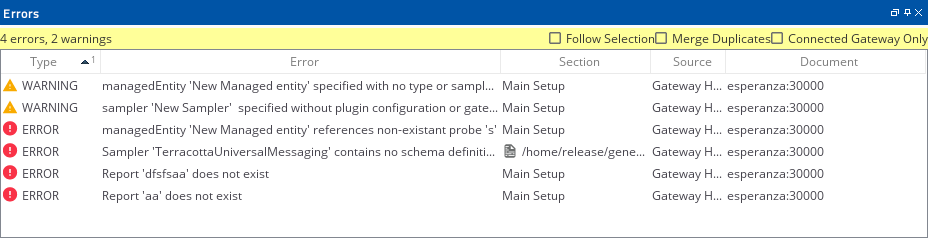
To find and resolve these configuration errors, you can double-click an item in the list which opens the relevant section in the navigation and loads the section in the settings editor. This highlights any potential errors in the setup. For example:
Filtering errors Copied
You can apply three types of filters to the errors list:
| Table Heading | Description |
|---|---|
| Type | The types of the error: warning, error or critical. For more information, see Error types. |
| Error | A detailed description of the error. |
| Section |
The navigation section.
|
| Source |
Indicates which validation type is the source of an error. It can be either:
For more information, see Validation types. |
| Document | The setup that generated the error. |
The Search Results Dockable Copied
Search Copied
The editor has two search features; Basic Search and Reference Search
Basic Search Copied
To start a basic search, select Tools > Search or press Search open documents in the toolbar. This opens the following:
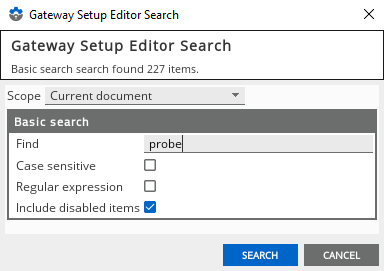
Type in a piece of text to search for and press Search, this will perform a case insensitive search of the XML.
The Scope dropdown allows you to chose what is searched:
- ‘Current Document’ is the initial default and means that the whole of the setup you are editing will be searched, including any open include files.
- ‘Current Selection’ restricts the search to the section of the setup that is highlighted in the navigation pane.
- ‘All open documents’ means that, if you are editing more than one setup (connected Gateway or directly opened file), they will all be searched.
If ‘Case sensitive’ is checked, the exact text will be searched.
If ‘Regular expression’ is checked, the text will be processed as a regular expression.
Unless ‘Include disabled items’ is checked, the results will exclude items which are disabled or are contained in a section of the setup which is disabled.
The Search Results table Copied
The search results are displayed in a table format:
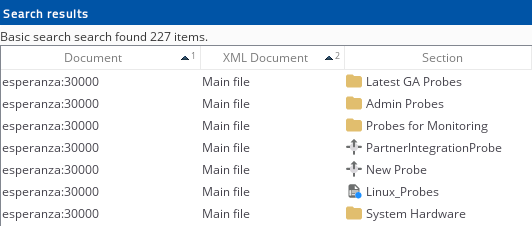
Double clicking on an item in list will select the relevant section in the navigation, and load the section in the settings editor.
Disabled items are shown with the section names crossed out, as seen for the managed entities and alert hierarchies in the example above.
| Table Heading | Description |
|---|---|
| Document | The document (setup) that contains the search match |
| Section | The navigation section that contains the search match |
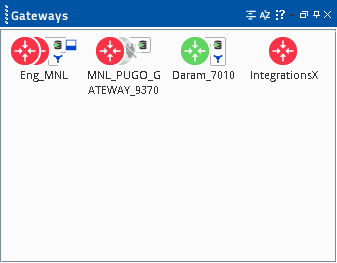
The Gateways Dockable Copied
The gateways view is a list of all the connections, in the form of Gateways:
You can add new Gateway connections by selecting File > Connect. This adds the connection and automatically open the setup.
You can open a setup for a Gateway by double clicking on the item in the Gateway view. If the setup is already open, it will select it in the editor.
Removing gateway connections Copied
When running the GSE standalone you can remove Gateway connections by deleting them. You can do this by:
- Right-clicking on a Gateway in the Gateways dockable and s electing Delete gateway.
- Selecting a Gateway and pressing
Deleteon your keyboard.
The Document area Copied
Document tabs Copied
The document tabs are at the top of the central editing area:

There is a tab per each open document. Selecting a tab will bring that document to the front, and show the navigation for the document in the navigation view.
To the right of the tab area there are three buttons. The left and right arrows allow you to ‘scroll’ the tabs along when they are not all visible. The third button shows a list of all the open documents for selection.
Right clicking on a tab will present a context menu. If more than one document is open, you will see this menu:
| Menu | Description |
|---|---|
| Close | Close the document clicked on |
| Close Others | Close all the other documents |
| Close All | Close all open documents |
| Next | Select the next tab |
| Previous | Select the previous tab |
| New Horizontal Group | Splits the document view horizontally |
| New Vertical Group | Splits the document view vertically |
The Setting editor Copied
The settings editor is the main area in the centre of the editor:
This section explains how this part of the editor is structured.
Section Tabs Copied
The settings are normally sectioned into tabs. Although every section is different, typically there at least two tabs:
| Tab name | Description of contents |
|---|---|
| Basic | Compulsory and commonly used settings |
| Advanced and Other tabs | Optional settings, used less often |
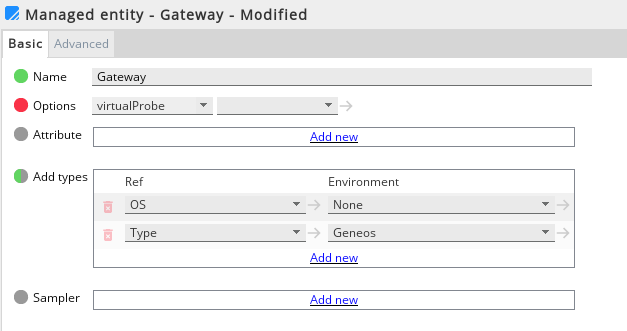
Indicators Copied
Indicators are used in the settings editor to indicate if settings are compulsory or optional, and if they are in an invalid state:
This table explains the meaning of the indicators:
| Indicator | Icon | Description |
|---|---|---|
| Compulsory |
|
The setting is compulsory, and is in a valid state. |
| Compulsory and invalid |
|
The setting is compulsory, and is in an invalid state. |
| Optional and not created |
|
The setting has not been created. |
| Optional |
|
The setting is optional, and is in a valid state. |
| Optional and invalid |
|
The setting is optional, and is in an invalid state. |
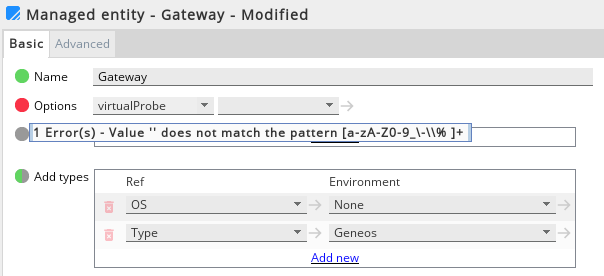
When a setting is in an invalid state, you can move the mouse over the setting to see a description of the problem:
Creating and removing settings Copied
Optional settings that have not been created are shown ‘greyed out’.
To create the setting, either right click on the setting and select ‘Create
Once the setting is created, it can be removed by right clicking and selecting ‘Remove
Table settings Copied
Some settings have multiple instances, or rows. These setting are presented in a table format.
To add a row to the table, click the ‘Add new’ link at the bottom of the table.
To remove a row, press the ‘X’ at the beginning of each row.
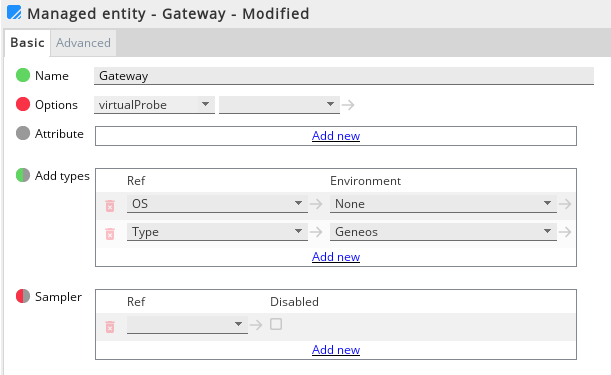
Referencing ‘Named items’ Copied
Some settings reference named items in the setup (e.g. a Managed Entity references a Probe).
These settings are always combo boxes, and they always have an arrow to the right of the combo box.
To select a reference simply press the arrow to the right of the combo box and select the reference of your choice.
Jumping to and creating referenced items Copied
To jump to a referenced item, simply click on the arrow to the right of the combo box:
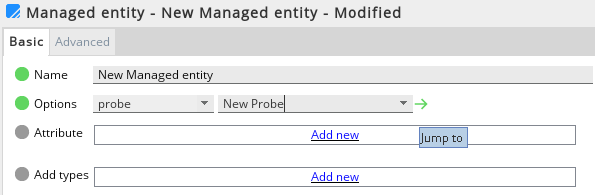
In some situations you may wish to create a new referenced item from this component. To do so, simply type in a new name (one that is not in use for this type), and press the arrow. You will be presented with a dialog to create the new item.
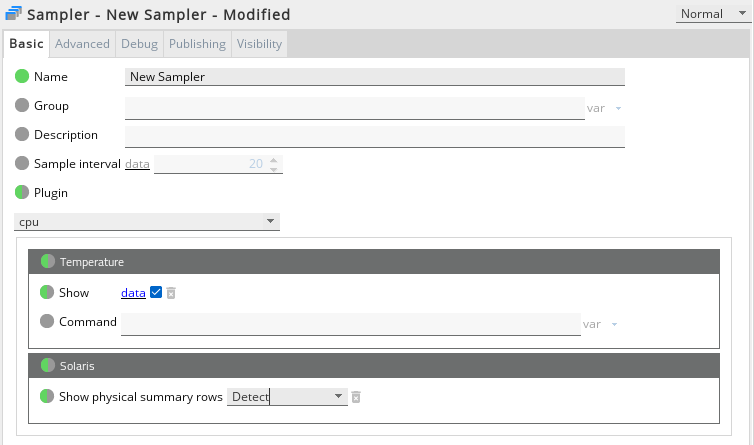
Data/Variable settings Copied
Some settings can be Data or Variables. An example of this is the Sample interval of a managed entity: The interval can either be data (an integer value in seconds) or a variable value (which must also be an integer type)
Data/Variable settings always have data or var link directly after the label and before the component:
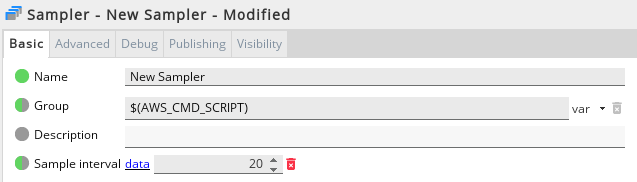
The link acts a toggle, switching the component between a data and a variable.
A variable setting is reference to a named item elsewhere in the setup (See Referencing ‘Named items’)
String variable settings Copied
String variable settings are a mixture of string constants, and variables.
String variable settings always consist of a text field, and drop down menu with all the variable values inside. The Gateway will substitute the variables at runtime, and concatenate the values together.
Example:
Define two variables:
Variable 'var1', Type: Integer, Value: 10
Variable 'var2', Type: Boolean, Value: true
String variable value in editor:
The value of var1 is $(var1), and var2 is $(var2)
The Gateway substitutes the values, giving the final string:
The value of var1 is 10 and var2 is true
Comments Copied
Comments can be added to any top level entity in the Navigation window
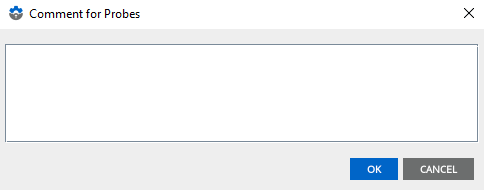
To create a comment:
- Right click on the target component and select Create comment.
- This will create the Comment for
<Entity>window. - You can now type the comment text. Click OK to add the comment or Cancel to exit without saving. Comments are displayed at the top of the Editor window.
To edit a comment, right click on an entity with a comment and click Edit Comment or Remove Comment.
You can still add XML comments to any node by switching to XML mode. If XML comments are present, a message is displayed below the comment box in the form: <N> additional comment(s) in XML.
If you have updated from an older version of Gateway Setup Editor which allowed comments to be attached to individual configuration options then existing comments will still be available from the XML editor.
Getting Help Copied
To get help for a setting, right click on the setting and select Help:
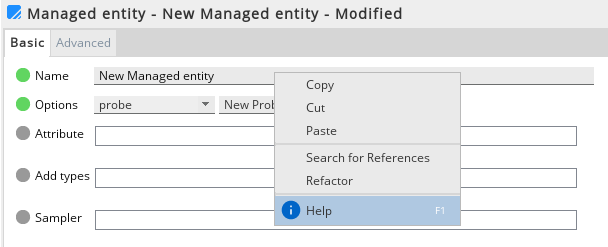
The GSE opens a browser window and takes you to the Geneos online documentation for the setting. The version of the help accessed corresponds to the schema version, not the GSE version.
If you do not have readily available internet access, you can also download the Geneos documentation for your version and configure the GSE to point at this downloaded version instead. See Host the documentation locally to use GSE context-sensitive help.
Note: We recommend that you always use the online documentation where possible, as it contains the most up-to-date information.
XML editor Copied
The XML editor allows you to edit the underlying XML of the setup, bypassing the standard user interface.
To start the XML editor for section, select the section in the main navigation, and then select XML from the combo box at the top right of the setting editor:

The XML editor has several functions, all of which are available from the main toolbar, the XML editor menu, or using the context menu by right clicking in the editor.
These functions are:
| Function | Description |
|---|---|
| Format | Formats the XML according to a predefined style. |
| Revert | Reverts the XML text to the state it was in when the editor was enabled. |
| Find | Shows a find dialog for performing text searches in the editor. |
| Apply | Applies the current XML to the editor. |
Once you have finished editing the XML, you should apply it to make sure the changes are valid.
You can apply the changes by pressing ‘Apply’ on the main toolbar, or switching back to normal mode using the combo box at the top right of the setting editor.
If the XML is invalid, you may see this dialog:
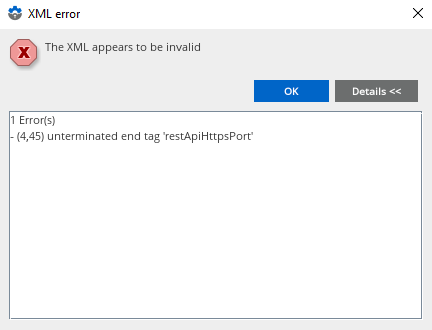
You must fix the error before you can save the setup.
Find function in XML editor Copied
In the Find dialog, you can use wildcards or regular expressions in your searches.
To do this, tick the Use box and select Regular Expressions (default) or Wildcards. You can then use the button to the right of the search box to add regular expressions or wildcards to your searches.
After pressing Find, click on the XML editor and use F3 to cycle through your matched items in a search.
Rule editor Copied
The Rule editor is the text area at the bottom of a rule:
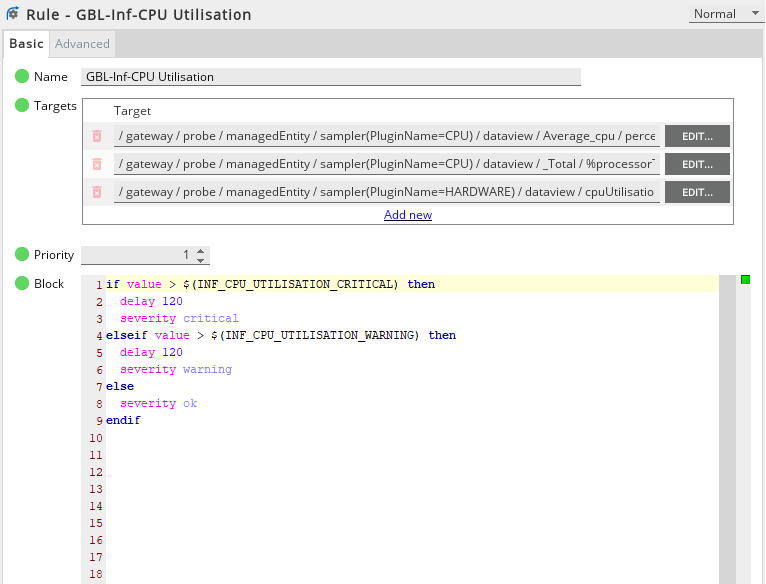
The rule editor is a syntax highlighting code editor, for the ‘Geneos’ language.
Templates and Code assistance Copied
The editor has some predefined templates to assist you. To use a template, right-click the editor and then select Templates. The code will be inserted at the cursor position in the rule editor.
The templates are not complete; they require you to modify the code with appropriate values.
Fixing errors Copied
If your rule code contains errors you will not be able to save the setup. You must fix any code errors first.
Errors are indicated in two ways in the rule editor:

Errors are underlined in the text, and they are indicated in the error bar on the right hand side.
Refactor Copied
Refactoring allows you to globally change the name of a ’named item’, and all of its references.
To start refactoring, right click on a ’name item’ in the navigation and select ‘Refactor’. Alternatively, right click on the name setting in the setting editor and select ‘Refactor’.
The Refactor dialog will open:
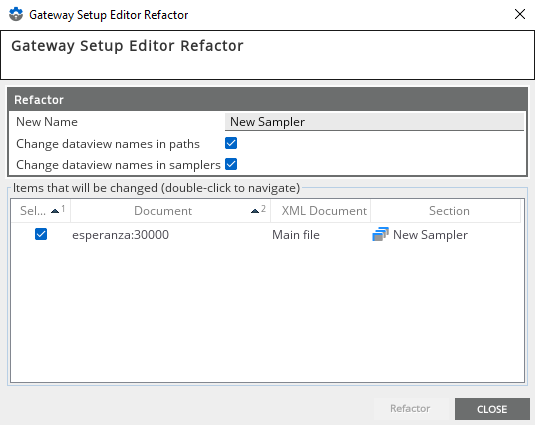
The dialog is made of two parts; the new name and the items that will be changed. To perform the refactor operation, change the name in the ‘New name’ field, then select the items you wish to change in the list at the bottom of the dialog. Finally press the ‘Refactor’ button.
You should see the dialog change. It now displays the number of items that have been refactored.
You can see an example below:

The Refactor dialog will remain open, in case you wish to rename the items again. Press the ‘Close’ button to dismiss the refactor dialog.
File Locking Copied
Gateway has file locking mechanism’s which can be accessed through the Gateway setup editor.
These features are only available when editing a setup through a gateway connection.
Obtaining and releasing a lock Copied
To obtain a lock select Tool > Lock, or click the Lock the current document in the toolbar.
If the lock is unsuccessful, then it means that the file is already locked.
Note
You cannot obtain the lock twice! If the lock failed you can find out who has the lock by getting lock information (See ‘Getting lock information’).
If the lock has failed because another user already has the lock, you can Force lock (Tools->Force lock). This will remove the current lock (if any), and obtain the lock.
To release the lock select Tools > Unlock, or press Unlock the current document in the toolbar.
If the unlock is unsuccessful, an error will be displayed. You cannot unlock if you do not own the lock, or the file is not locked.
Getting lock information Copied
At any time you can get lock information for a setup. To get lock information, select Tools->Get lock information, or press ‘Get lock information on the current document’. You will see a dialog like this:
Lock information:
| Name | Description |
|---|---|
| MainSetupFile | Yes, if the lock is on the main setup file. No if it is an 'include' file. |
| Locked | Yes if the file is locked, No if the file is not locked. |
| ConnectionId | The internal connection id. |
| GatewayId | The gateway id. |
| Username | The username of the user who locked the file. ActiveConsoleX indicates an anonymous logon. |
| Workstation | The Hostname or IP address of the workstation that got the lock. |
| LockedTime | The date and time the lock was obtained. |
Losing the lock Copied
It is possible for another use the Force Lock a file. This removes and overrides the current lock, if there is any.
Autolock Copied
When a Gateway is started, it is possible to specify a parameter such that the GSE will automatically take the lock if connected to the Gateway. To start the gateway in this mode, launch it with the -autolock parameter.
With the autolock feature running, if the GSE connects to the main setup for the running gateway and the lock is available, it displays that the document has been automatically locked.
If you decide to keep the file locked, the Gateway Setup Editor will load the main setup and will display a message next to the top level to indicate that it is now locked, as illustrated below:
If the GSE attempts to connect to a running gateway with the autolock feature active, and the lock is not available, it will load the setup but will display a message against the top level to show that it is already locked by someone else.
Note
If gateway authentication is not in use, a more generic message may get displayed such as “Locked by Active Console”.
In this state, the user does not have the lock, and will be unable to write any changes back to the gateway server. However, if you leave the GSE in this state, and the lock subsequently gets released by the other user who was holding it, the fact that the lock is now available will get automatically detected.
While the main setup has become unlocked, and you reload and lock it again, then the main setup will be reloaded and they will have the lock for it.
Autolocking works in the same way for Include Files. With the autolocking feature active, when the user clicks on an include file to load it, the lock will automatically be taken if it is available. A message will now be shown next to the include file setup to indicate that it is now Locked.
If, however, another gateway also shares this include file, and a GSE connected to that gateway has already taken the lock on the include file, when the user attempts to load the include file it is still loaded but the user does not get the lock.
In this state, the user does not have the lock on the include file, and will be unable to write any changes made to the include file back to the gateway server.
Note
The user does still have the lock on the main setup file. The user can still make changes to the main setup file and save them back to the gateway server, they are only restricted from changing the include file.
Having made changes to the main setup, when the user tries to save the changes, gets a notification that either you do not have a permission, or the file is locked by another user.
If the lock on the include file is initially held by someone else, but the other user who was holding the lock subsequently releases it, the fact that the lock is now available will get automatically detected, and the include file will be reloaded and they will have the lock for it.
‘Include’ files Copied
Gateway 2 allows you to ‘include’ multiple files into the main setup. The files are merged by the gateway to produce the overall setup.
Creating an include file Copied
To create an include file you must first create the ‘Includes’ section. Click on includes in the navigation section.
To create an include file, right click on Includes, and select ‘New Include’.
An include file is not a ’named item’. The text in the ’name’ is actually its location, or path. Type in the path to a file in the location field:

Note
The path is relative to the main setup file location.
Loading an include file Copied
Included files are not automatically loaded as part of the main setup. To load a setup, you must expand the include node in the navigation tree, and click on the node Click to load.
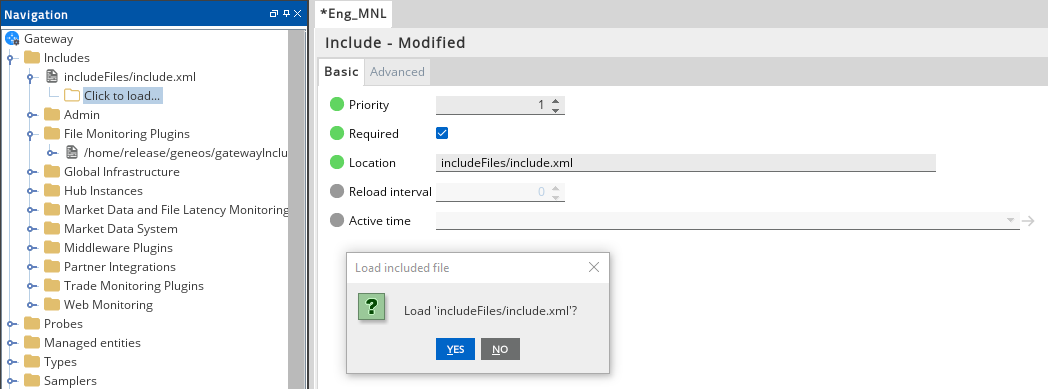
If the main setup file was loaded from a gateway connection, the editor will request the include file from the Gateway. If the file was loaded from disk, the editor will attempt to load the include file from disk.
Once the include file is loaded, the structure is the same as the main setup file, and editing is performed in exactly the same way.
Schema Copied
What is a schema? Copied
A schema is an XML document that describes the content of another XML document. In the case of the GSE, the schema describes the settings that can be configured for the Gateway, along with any Netprobe and Plug-In configuration that is sent to Netprobes.
The GSE reads the schema, and uses it to construct the GUI. This is presented to the user in two places; the navigation and the settings editor. A change in the schema can result in the structure of these components changing.
The schema also contains restriction information, enabling the GSE to validate the input, and provide useful feedback to the user.
A full description of XML Schema is beyond the scope of this manual. For comprehensive description, please refer to http://www.w3.org/XML/Schema
Schema versioning Copied
Schemas in the Geneos system are versioned using the same convention as all other Geneos components:
<Branch>-<YYMMDD>
e.g.: GA-091212
The GSE ships with the latest version of the schema at the date of release, which it uses to create new setup files. Each setup file contains a reference to the schema version and the GSE then uses that working schema version for editing the setup. When connected to a Gateway, GSE will use the schema version that the Gateway uses, however this version may change if the Gateway gets upgraded.
If the schema in GSE is upgraded, new settings might become available, as well as some settings may be hidden due to deprecation. It is recommended to use the version that the Gateway uses.
Once GSE has obtained the latest available version from the Gateway, it will use that version when creating new setups.
Determining Schema Version Copied
The schema version for the active document is displayed in the status bar at the bottom right of the GSE window.
The version status bar can be in these states:
| State | Example Status bar | Description |
|---|---|---|
| Normal |

|
The document is using the working schema |
| Alternate schema |

|
The document is using an alternate schema, i.e. a schema loaded from disk by the user |
| Incorrect schema |

|
The document is using a different version of the schema than the one specified |
If you move the mouse over the schema version, a tooltip will give you extra information.
Switching to Alternate Schema Copied
In some scenarios it may be necessary to switch to an alternate schema. To do this, go to Schema -> Switch…. You must pick a valid schema from the file chooser. The status bar will change to indicate that you are using an alternate schema.
At any time you can switch back to the working schema by choosing Schema->Switch to working schema.
Loading Setup with Alternate Schema Copied
If you load a setup that was previously saved using an alternate schema, either by you or by another user, then GSE will offer to choose between the current and that special schema.
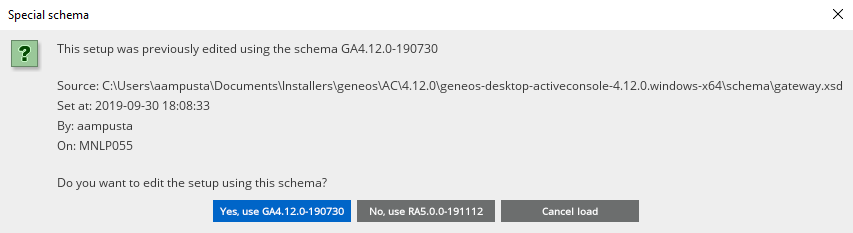
If the alternate schema is unknown to GSE, it will ask the user to locate that schema on the disk. This can happen if the schema was edited by another user.
Gateway Schema Change Copied
The gateway will publish its current schema version, however it may change if the Gateway or a Probe connected to that Gateway is upgraded. If the schema changes while the Gateway’s setup is being edited, GSE will show a notification and will offer to load the new schema.
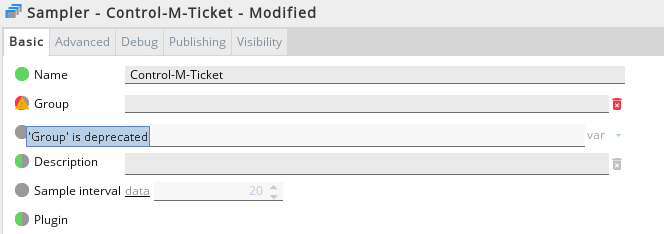
Deprecated settings Copied
When GSE schema is upgraded, some settings may be hidden due to deprecation unless they already have a value. To view all the deprecated settings anyway, choose View > Show deprecated. All such settings will be marked with a warning sign.
Start up settings Copied
There are a number of startup flags and settings you can define which modify the behavior and configuration of the GSE while it is running. These settings are configured by modifying the GatewaySetupEditor.gci file that resides in the same directory as the GatewaySetupEditor.exe. This file is a text file, so can be edited in any text editor.
The file that is shipped with GSE will look something like this:
############################################################
#### The java class that has 'main'
############################################################
-mainclass
com.itrsgroup.gse.GatewaySetupEditor
############################################################
#### The JVM to use and arguments
############################################################
-jvm
.\JRE\bin\client\jvm.dll
-jvmargs
Xmx128M
Ddocking.floatingContainerType=frame
############################################################
#### Misc
############################################################
#The jvm depends upon dll's in this directory (e.g. msvcr71.dll)
-path
JRE\bin
-logexceptions
-gsedir
gse
The syntax Copied
The file is newline delimited; each flag starts with a hyphen. Any arguments for a given flag are again separated by a newline. Any lines that begin with ‘#’ or are empty are ignored.
#comment1
-<Flag1><Flag1Arg>…#comment2
<Flag2><Flag2Arg>…
GatewaySetupEditor.exe flags Copied
See Start Up Settings.
Host the documentation locally to use GSE context-sensitive help Copied
The context-sensitive help for the GSE requires internet access to connect to the Geneos online documentation. If this is not possible for your system, you can opt to download and host a copy of the documentation locally for the context-sensitive help.
Note: We recommend that you always use the online documentation where possible, as it contains the most up-to-date information.
Create a hosting folder, download and unpack the files Copied
First, you must configure a folder to act as a web server, and download and unpack the files:
- Configure a folder on your machine to act as a web server host the documentation.
- There are many methods for doing this, such as using Windows Internet Information Services (IIS) or a Python HTTP server.
- Download the offline documentation package for your version from Offline Documentation for Geneos.
- The file is called
offline-docs.GA<version>.zip.
- The file is called
- Download the context-sensitive help mappings bundle by clicking this link.
- The file is called
csh.zip.
- The file is called
- Create a folder inside the hosting folder called
<version>.- For example, if you downloaded the
offline-docs.GA.4.10.0.zippackage, create a folder called4.10.0.
- For example, if you downloaded the
- Unpack the documentation to the
<version>folder you have just created. - Unpack
csh.zipto the hosting folder.- This creates a folder called
csh.
- This creates a folder called
Success
You now have a folder set up to host the documentation, and inside this folder is acshfolder and a<version>folder.
Configure your Active Console and GSE .gci files Copied
After you set up your host for the documentation and add the files, you must configure your Active Console and Gateway Setup Editor .gci files:
- Open the
ActiveConsole.gcifile in yourActiveConsole2folder. - Find the
-cshHostsetting in the file. - Modify the value of the setting to location of the folder hosting the documentation.
- For example, if the folder is configured on the local machine on port 12345, then the setting is
http://localhost:12345.
- For example, if the folder is configured on the local machine on port 12345, then the setting is
- Save the file.
- Open the
GatewaySetupEditor.gcifile in yourActiveConsole2folder. - Repeat steps 2–4 for this file.
These settings take effect upon restarting the Active Console.
Success
Right clicking on Help on a setting in your GSE opens a browser window and takes you to the locally hosted documentation.
We recommend you periodically update both your documentation bundle and mappings bundle from our website to keep up-to-date with the latest documentation changes.
Troubleshooting Copied
To view the frequently asked questions in Geneos, see ITRS Support website.
Reporting faults and suggesting enhancements Copied
If you experience problems with the Gateway Setup Editor, or have suggestions for improvement, please contact the ITRS technical support team. You can do this by emailing helpdesk@itrsgroup.com or by visiting https://helpdesk.itrsgroup.com/.
When submitting a ticket, please attach the diagnostics file to help us identify your issue. To generate this file, follow these steps:
- Select Help > About on the menu in the GSE.
- Click Create diagnostic file.
- Select where you would like to save the file and enter the file name.
- Click Save.
If successful, the Created diagnostics window opens.